SR-IOV is a First Class FreeBSD Feature
A detailed walkthrough of how to setup hardware-driven virtualization using SR-IOV capable devices in FreeBSD.
One of my favorite hardware features is called Single-Root Input/Output Virtualization (SR-IOV). It makes a single physical device appear like multiple similar devices to the operating system. The FreeBSD approach to exposing SR-IOV capabilities is one of several reasons I tend to prefer FreeBSD on my servers.
SR-IOV for Networking Overview
Virtualization is a great solution if your demand for network devices exceeds the number of physical network ports on your server. There are many ways to accomplish this with software, but a hardware-based alternative is SR-IOV, which lets a single physical PCIe device to present itself as many to the OS.
There are several upsides to using SR-IOV. It offers the best performance compared to other means of virtualization. If you’re a stickler for security, SR-IOV better isolates memory and the virtualized PCI devices it creates. It also results in a very tidy setup as everything is a PCI device, i.e., no virtual bridges, switches, etc.
To make use of SR-IOV networking, you’ll need an SR-IOV capable network adapter and an SR-IOV capable motherboard. I’ve used several SR-IOV capable network cards over the years, such as the Intel i350-T4V2 Ethernet Adapter, the Mellanox ConnectX-4 Lx, and the Chelsio T520-SO-CR Fiber Network Adapter. For this article, I’ll be using an Intel X710-DA2 Fiber Network Adapter (product brief) in a FreeBSD 14.0-RELEASE server. It’s a nice option as it requires no special firmware configuration and driver support is built into the FreeBSD kernel by default. And as a bonus, it uses a fraction of the power of many alternatives, maxing out at only 3.7 Watts.
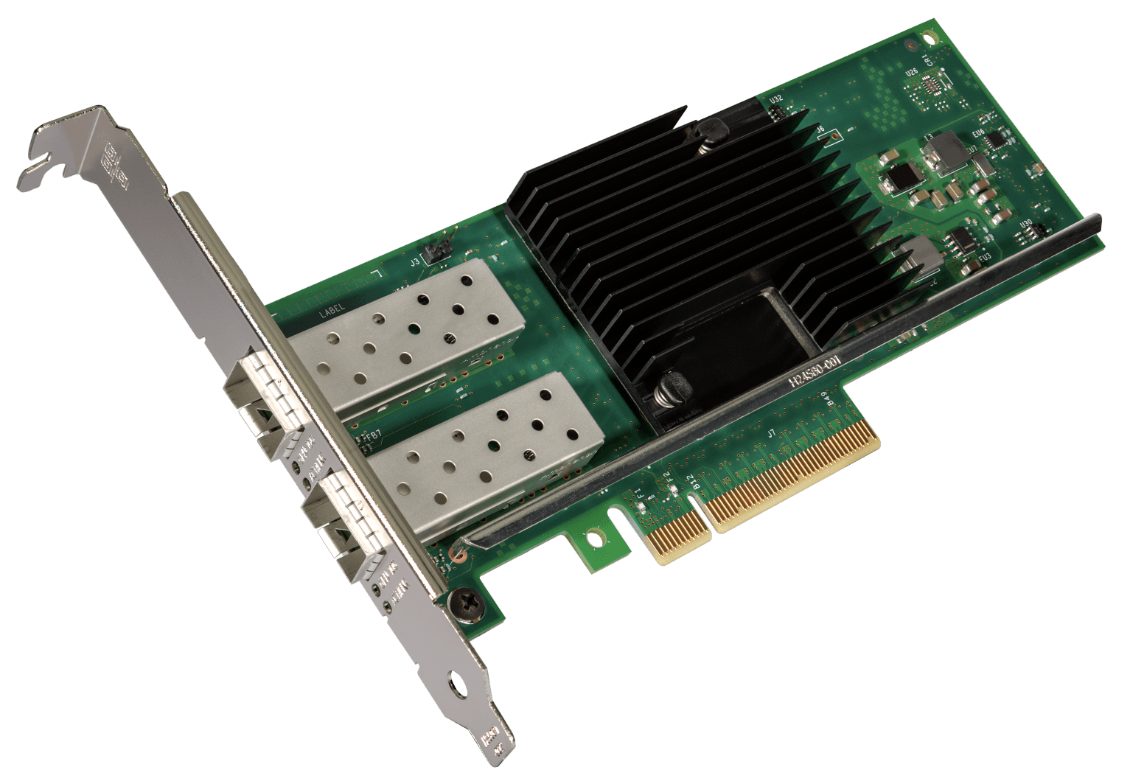 The Intel X710-DA2 PCIe 3.0 Fiber Network Adapter
The X710-DA2 has two physical SFP+ fiber ports. In SR-IOV terms, these correspond to physical functions (PFs). Without SR-IOV enabled, the PFs behave like the ports on any network adapter card and will show up as two network interfaces in FreeBSD. With SR-IOV enabled, each PF is capable of creating, configuring, and managing several Virtual Functions (VFs). Each VF will appear in the OS as a PCIe device.
In the case of the X710-DA2 specifically, its 2 PFs can virtualize up to 128 VFs. From the standpoint of FreeBSD, it’s as if you have a network card with 128 ports. These VFs can then be allocated to jails and virtual machines for isolated networking.
Using SR-IOV in FreeBSD
We touched a bit on how SR-IOV conceptually works, but I find it easier to understand with practical examples. Let’s walk through setting up SR-IOV in FreeBSD from scratch. To do this, we’ll focus on:
- Hardware Installation
- Hardware Configuration
- FreeBSD Configuration of SR-IOV
- Using an SR-IOV Network VF in a Jail
- Using an SR-IOV Network VF in a Bhyve Virtual Machine
Hardware Installation
The installation of the SR-IOV capable X710-DA2 is easy enough, but there is one major consideration. Not all PCIe slots on motherboards are created equally. I highly recommend you take a look at your motherboard’s manual before getting started. For this example, I’ll be using a Supermicro X12STH-F motherboard. The manual provides two insightful diagrams:
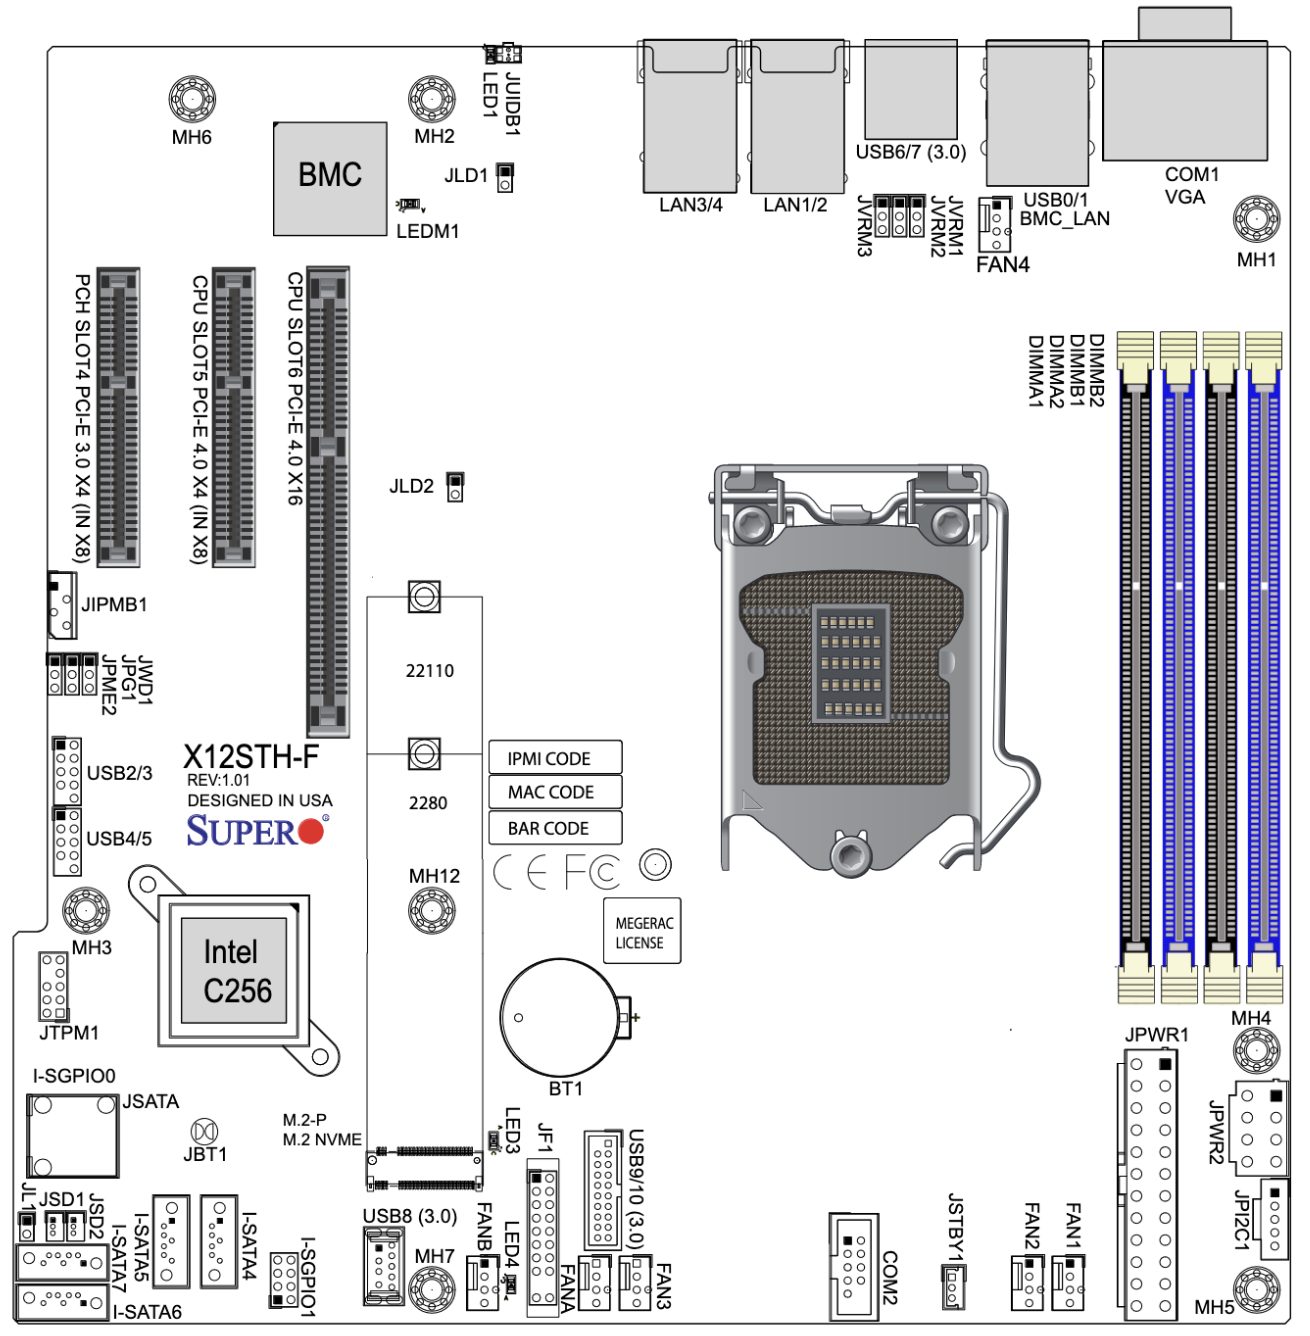 X12STH-F Motherboard Physical Map
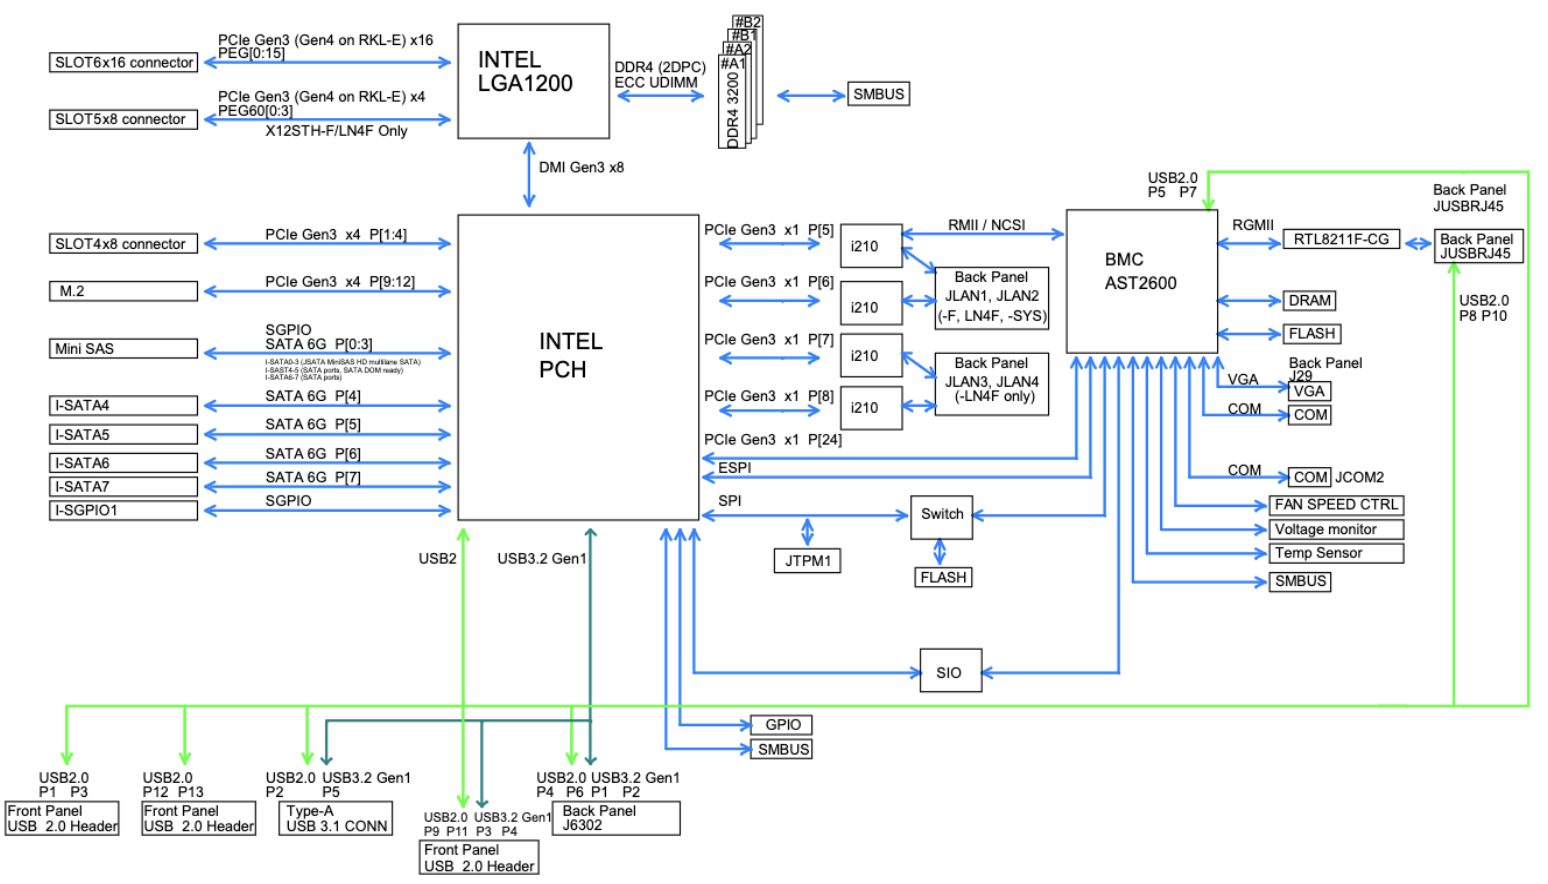 X12STH-F Motherboard Block Map
In the first diagram we see our PCIe slots are numbered 4, 5, and 6, left-to-right. If you look closely, you’ll see slot 4 has a “PCH” prefix while 5 and 6 have a “CPU” prefix. The block map diagram shows what this means in a bit more detail. Slots 5 and 6 connect directly to the CPU in the LGA1200 socket, while slot 4 connects to the Platform Controller Hub. Depending on the specific components in your system, this may determine which slots will allow SR-IOV to work as expected. There’s no easy way to know until later when we configure FreeBSD, but as a rule of thumb, especially with older motherboards, I find the CPU slots to be a reliable choice. If you do find in later steps that SR-IOV is not working, try using a different PCIe slot. Motherboard documentation isn’t always detailed, so trial and error is sometimes the quickest way to see which slot will work.
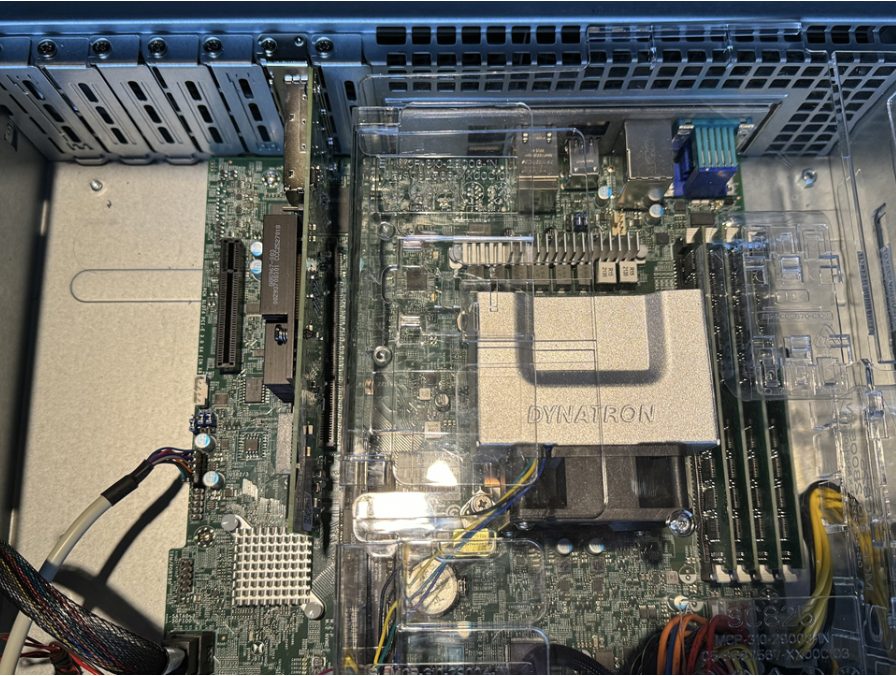 Supermicro X12STH-F Motherboard, CPU PCIe Slot 6 with Intel X710-DA2
(Also: Intel Xeon E-2324G w/ 4x8GB ECC UDIMM in a Supermicro 825TQC-R740LPB 2U Chassis)
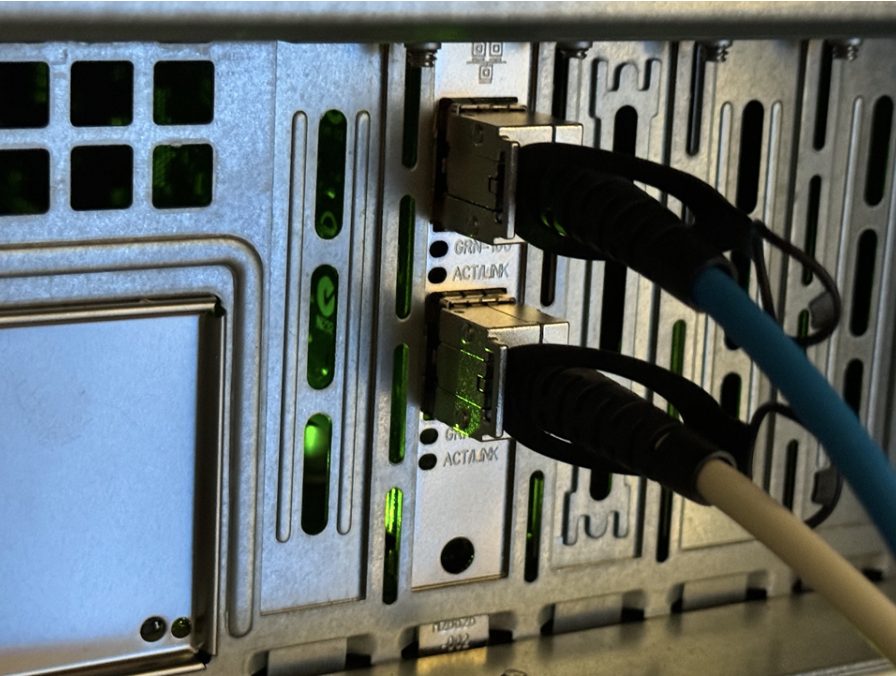 ntel X710-DA2 SFP+ Ports with DAC Cables Attached
Hardware Configuration
The X710-DA2 will behave like a non-SR-IOV capable card until you enable SR-IOV in your motherboard settings. It’s easy to do, but also quite easy to forget, so be sure you don’t skip this important step.
The exact procedure will vary by motherboard, but most will have a screen with PCIe configuration options. Find that screen and enable SR-IOV. While you’re there it’s a good idea to check other settings are enabled that you’re likely to use in conjunction with SR-IOV, like CPU virtualization.
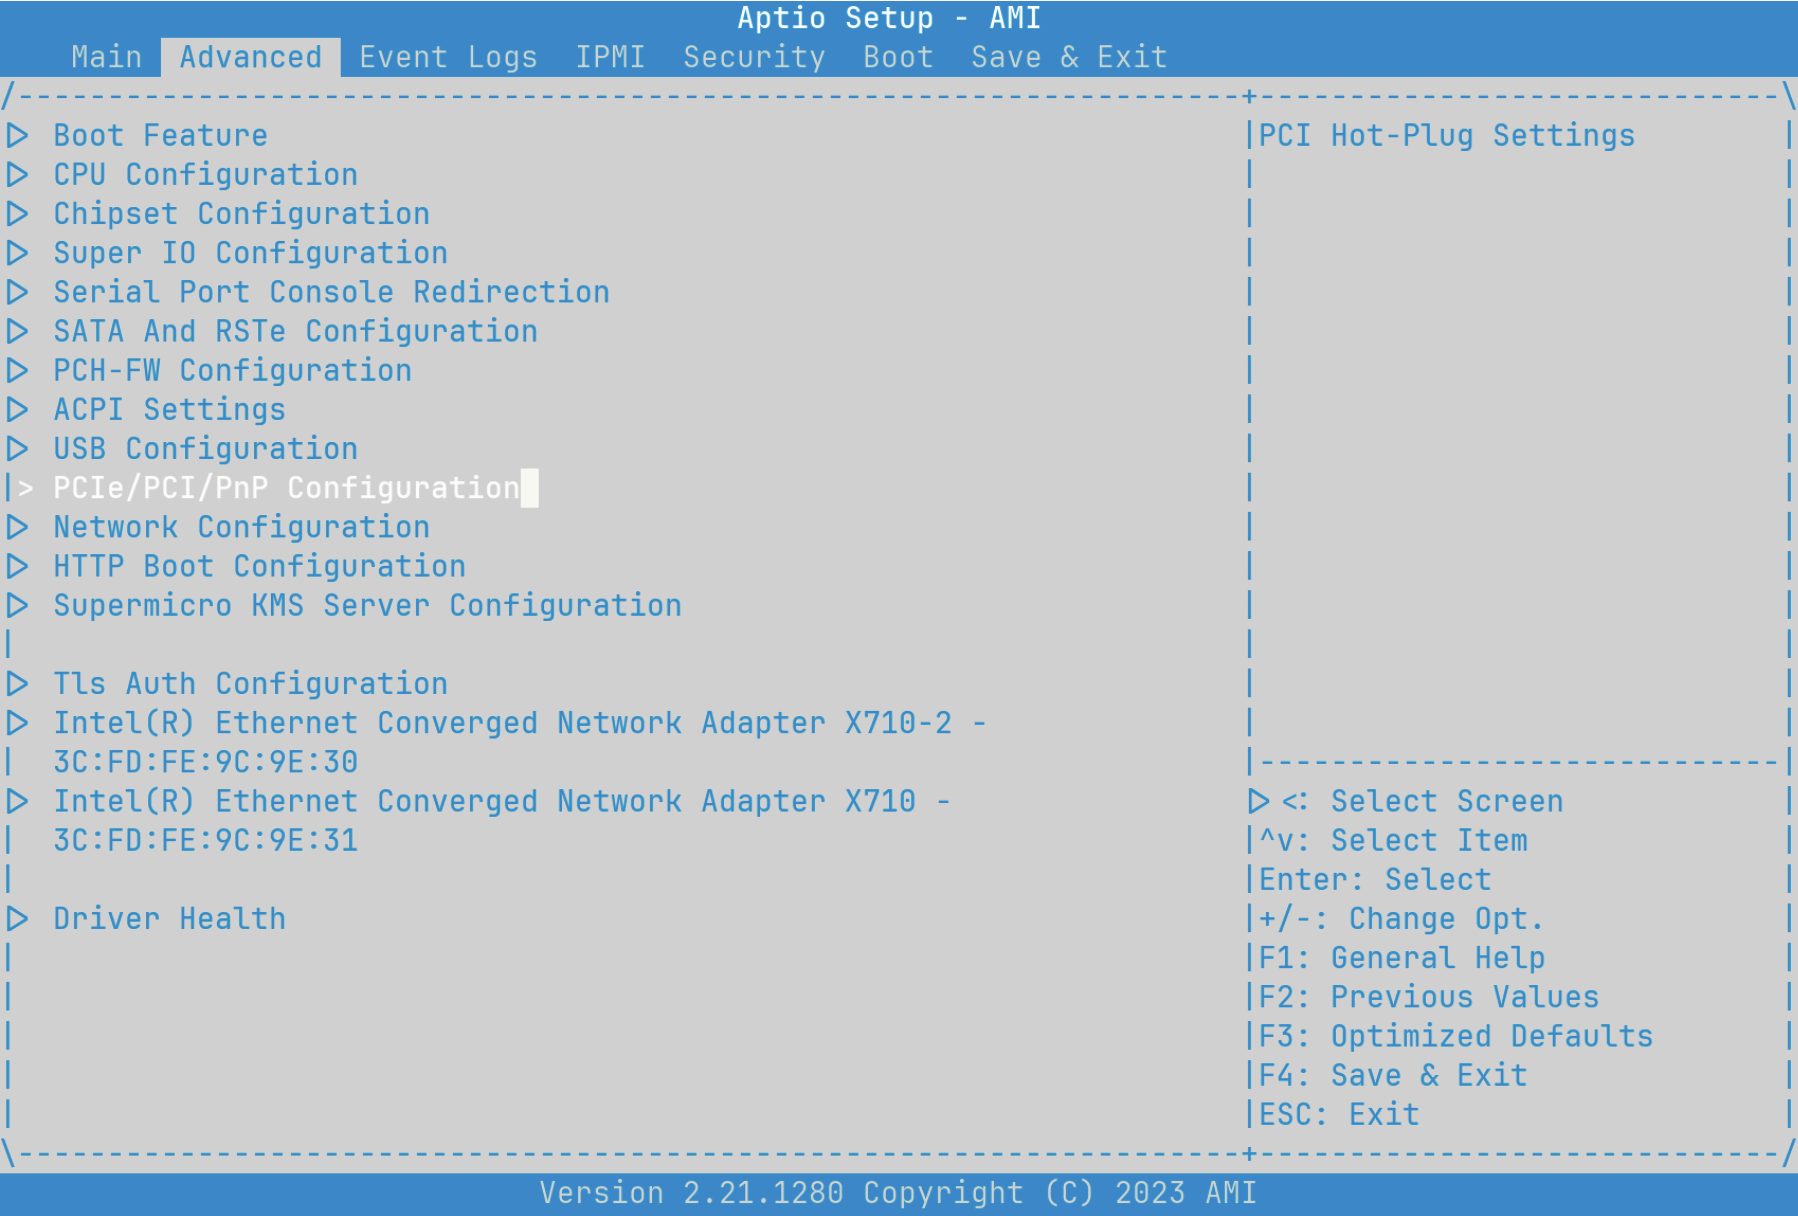 X12STH-F Motherboard Setup, PCIe Configuration on Advanced Screen
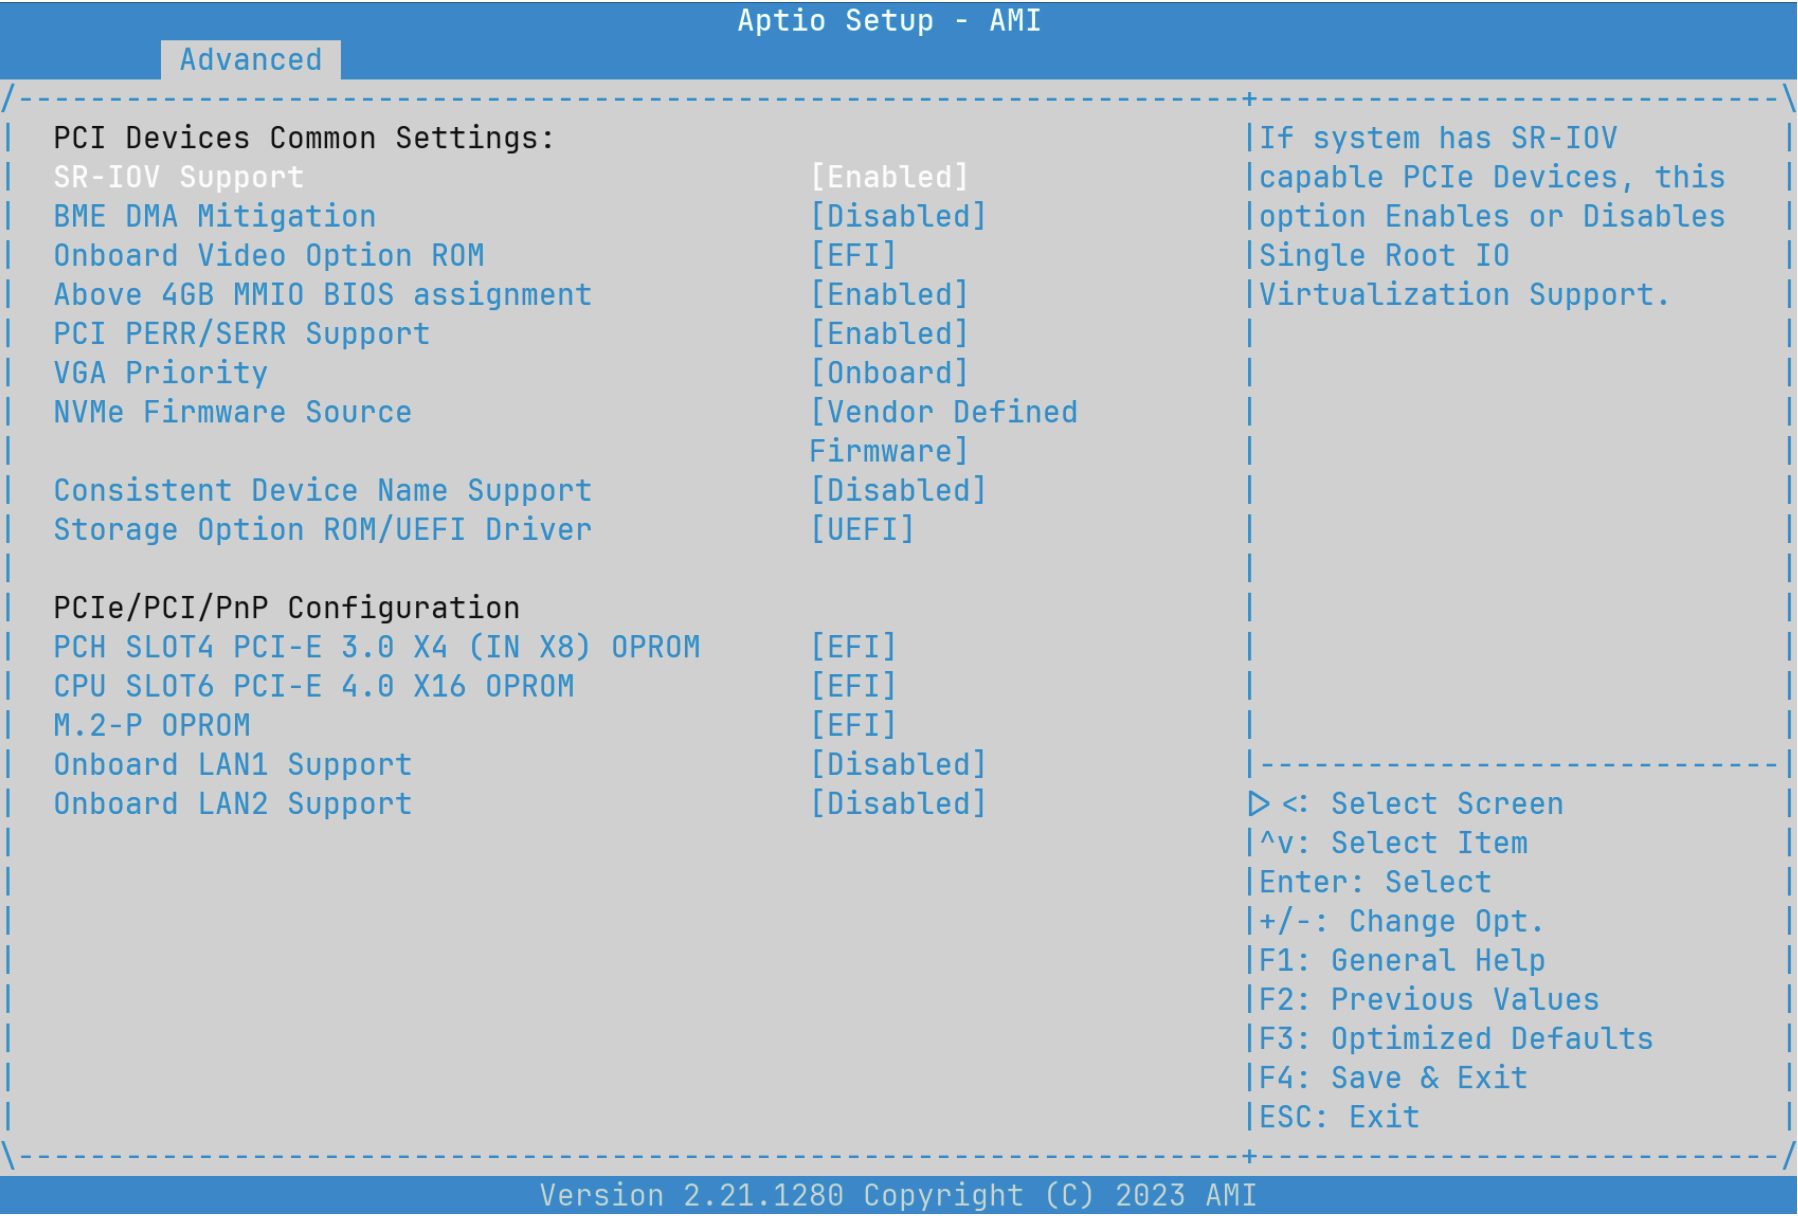 X12STH-F Motherboard Setup, SR-IOV Configuration on PCIe Screen
We can now boot FreeBSD and take a look at dmesg(8). Here’s a snippet from mine.
ixl0: <Intel(R) Ethernet Controller X710 for 10GbE SFP+ - 2.3.3-k> mem
      0x6000800000-0x6000ffffff,0x6001808000-0x600180ffff irq 16 at device 0.0 on pci1
ixl0: fw 9.120.73026 api 1.15 nvm 9.20 etid 8000d87f oem 1.269.0
ixl0: PF-ID[0]: VFs 64, MSI-X 129, VF MSI-X 5, QPs 768, I2C
ixl0: Using 1024 TX descriptors and 1024 RX descriptors
ixl0: Using 4 RX queues 4 TX queues
ixl0: Using MSI-X interrupts with 5 vectors
ixl0: Ethernet address: 3c:fd:fe:9c:9e:30
ixl0: Allocating 4 queues for PF LAN VSI; 4 queues active
ixl0: PCI Express Bus: Speed 2.5GT/s Width x8
ixl0: SR-IOV ready
ixl0: netmap queues/slots: TX 4/1024, RX 4/1024
On the third line we see some SR-IOV references. “PF-ID[0]” is associated with ixl0, and this PF is capable of 64 VFs. And on the tenth line we get a nice confirmation that this PCIe device is “SR-IOV ready.” The reason for the “ixl” name is that this card uses the ixl(4) Intel Ethernet 700 Series Driver.
There’s nothing else you need to do to configure the X710-DA2’s hardware. Some cards (like the aforementioned Mellanox) require you to configure the card’s firmware, while other cards (like the aforementioned Chelsio) require driver configuration in `/boot/loader.conf`. Neither is needed with the X710-DA2, though you may want to check the card’s firmware version and update it if necessary.
With this, we’re ready to shift our focus from hardware setup to FreeBSD configuration.
FreeBSD Configuration of SR-IOV
Using PFs
A nice thing about SR-IOV is regardless of whether or not you tell a PF to create VFs you can still use the PF as a network interface. I’ll add the following to my `/etc/rc.conf` and assign an IP address to the PF for use in the host
ifconfig_ixl0=”inet 10.0.1.201 netmask 255.255.255.0”
defaultrouter=”10.0.1.1”
Now when I boot the system, I can expect the ixl0 device to have an IP address that I can use to connect to the system regardless of whether SR-IOV is enabled or not.
Telling PFs to Create VFs
Management of PFs and VFs in FreeBSD is handled by iovctl(8), which is included in the base OS. To create VFs, we need to create a file in the `/etc/iov/` directory with some specifics of what we want. We will execute a simple strategy and create one VF to assign to a jail, and a second for a bhyve virtual machine. The iovctl.conf(5) manual page will give us the most important parameters.
OPTIONS
     The following parameters are accepted by all PF drivers:

     device (string)
             This parameter specifies the name of the PF device.  This
             parameter is required to be specified.

     num_vfs (uint16_t)
             This parameter specifies the number of VF children to create.
             This parameter may not be zero.  The maximum value of this
             parameter is device-specific.
I like to set num_vfs to what I need. We could set it to the max, but I find it makes looking at ifconfig and other command output more difficult.
Additionally, as different cards have different drivers, each driver has options you can set based on the hardware capability. The ixl(4) manual page lists several optional parameters.
IOVCTL OPTIONS
     The driver supports additional optional parameters for created VFs
     (Virtual Functions) when using iovctl(8):

     mac-addr (unicast-mac)
             Set the Ethernet MAC address that the VF will use.  If
             unspecified, the VF will use a randomly generated MAC address.
Or, alternatively, you can use the iovctl command for a terse summary of what parameters are valid for a PF and its VFs, and what their defaults are.
(host) $ sudo iovctl -S -d ixl0
The following configuration parameters may be configured on the PF:
     num_vfs : uint16_t (required)
     device : string (required)

The following configuration parameters may be configured on a VF:
     passthrough : bool (default = false)
     mac-addr : unicast-mac (optional)
     mac-anti-spoof : bool (default = true)
     allow-set-mac : bool (default = false)
     allow-promisc : bool (default = false)
     num-queues : uint16_t (default = 4)
We’ll make use of the mac-addr parameter to set specific MAC addresses for each VF. Setting the MAC address is a bit arbitrary in this case, but I’ll do it to demonstrate how a config file looks with PF parameters, default VF parameters, and parameters specific to individual VFs.
PF {
       device : “ixl0”
       num_vfs : 2
}

DEFAULT {
       allow-set-mac : true;
}

VF-0 {
       mac-addr : “aa:88:44:00:02:00”;
}

VF-1 {
       mac-addr : “aa:88:44:00:02:01”;
}
This instructs ixl0 to create two VFs. By default, every VF will be allowed to set it’s own MAC. And each VF will have an initial MAC address assigned to it (which can be overridden with the previous default setting).
Before we make it effective, let’s take a look at our current environment. We’ll find two ixl PCI devices, and two ixl network interfaces.
(host) $ ifconfig -l
ixl0 ixl1 lo0

(host) $ pciconf -lv | grep -e ixl -e iavf -A4
ixl0@pci0:1:0:0:        class=0x020000 rev=0x01 hdr=0x00 vendor=0x8086
device=0x1572 subvendor=0x8086 subdevice=0x0007
    vendor     = 'Intel Corporation'
    device     = 'Ethernet Controller X710 for 10GbE SFP+'
    class      = network
    subclass   = ethernet
ixl1@pci0:1:0:1:        class=0x020000 rev=0x01 hdr=0x00 vendor=0x8086
device=0x1572 subvendor=0x8086 subdevice=0x0000
    vendor     = 'Intel Corporation
    device     = 'Ethernet Controller X710 for 10GbE SFP+'
    class      = network
    subclass   = ethernet
To make our /etc/iov/ixl0.conf configuration effective, we use iovctl(8).
(host) $ sudo iovctl -C -f /etc/iov/ixl0.conf
Should you change your config file, delete and recreate the VFs.
(host) $ sudo iovctl -D -f /etc/iov/ixl0.conf
(host) $ sudo iovctl -C -f /etc/iov/ixl0.conf
To check that it worked, let’s run the same ifconfig and pciconf commands from before.
(host) $ ifconfig -l
ixl0 ixl1 lo0 iavf0 iavf1

(host) $ pciconf -lv | grep -e ixl -e iavf -A4
ixl0@pci0:1:0:0:        class=0x020000 rev=0x01 hdr=0x00 vendor=0x8086 device=0x1572 subvendor=0x8086 subdevice=0x0007
    vendor     = 'Intel Corporation'
    device     = 'Ethernet Controller X710 for 10GbE SFP+'
    class      = network
    subclass   = ethernet
ixl1@pci0:1:0:1:        class=0x020000 rev=0x01 hdr=0x00 vendor=0x8086 device=0x1572 subvendor=0x8086 subdevice=0x0000
    vendor     = 'Intel Corporation'
    device     = 'Ethernet Controller X710 for 10GbE SFP+'
    class      = network
    subclass   = ethernet
--
iavf0@pci0:1:0:16:        class=0x020000 rev=0x01 hdr=0x00 vendor=0x8086 device=0x154c subvendor=0x8086 subdevice=0x0000
    vendor     = 'Intel Corporation'
    device     = 'Ethernet Virtual Function 700 Series'
    class      = network
    subclass   = ethernet
iavf1@pci0:1:0:17:        class=0x020000 rev=0x01 hdr=0x00 vendor=0x8086 device=0x154c subvendor=0x8086 subdevice=0x0000
    vendor     = 'Intel Corporation'
    device     = 'Ethernet Virtual Function 700 Series'
    class      = network
    subclass   = ethernet
Voilà! Our shiny new VFs have arrived. In the `pciconf` output we still see our ixl devices, but now there are two iavf devices. The iavf(4) manual page let’s us know that this is the driver for Intel Adaptive Virtual Functions.]
In addition to seeing new PCI devices, ifconfig confirms that they are indeed recognized as network interfaces. For the most common aspects of a network device, you’ll probably not be able to tell the difference between a PF and VF. If you want to get into the details and differences, check out the driver documentation and the -c capabilities flag of pciconf, e.g. pciconf -lc iavf.
To make this config persistent across reboots, amend your /etc/rc.conf file.
# Configure SR-IOV
iovctl_files=”/etc/iov/ixl0.conf”
Now we’ve got two VFs ready for action. Let’s put them to use!
Using an SR-IOV Network VF in a Jail
This section assumes you have a basic understanding of FreeBSD Jails. As such, setting up a jail from scratch is out of scope. For more information how to do this, see the Jails and Containers chapter of the FreeBSD Handbook.
I don’t use any jail management ports and rely on what come in the base OS. If you’ve used something like Bastille, the specifics on how/where to put your configs might vary a bit, but the concept is the same. In this example we’re working with a jail named “desk.”
exec.start += “/bin/sh /etc/rc”;
exec.stop = “/bin/sh /etc/rc.shutdown”;
exec.clean;
mount.devfs;

desk {
        host.hostname = “desk”;
        path = “/mnt/apps/jails/desk”;
        vnet;
        vnet.interface = “iavf0”;
        devfs_ruleset=”5”;
        allow.raw_sockets;
}
That’s it! The jail now has access to its own dedicated VF network device setup via vnet(9). I’ll tweak the jail’s /etc/rc.conf file to enable it.
ifconfig_iavf0=”inet 10.0.1.231 netmask 255.255.255.0”
defaultrouter=”10.0.1.1”
Now let’s start the jail and check that it works.
(host) $ sudo service jail start desk
Starting jails: desk.
(host) $ sudo jexec desk ifconfig iavf0
iavf0: flags=1008843
As expected, we see the iavf0 interface in the jail and it appears to be working normally. But what about that device in the host OS? Is it still there? Let’s check.
(host) $ ifconfig -l
ixl0 ixl1 lo0 iavf1
Using an SR-IOV Network VF in a Bhyve Virtual Machine
You can achieve a similar result with bhyve(8) virtual machines, though the approach is a bit different. With jails we can assign/release VFs during runtime. With bhyve, this must be done at boot time and requires a tweak to our SR-IOV config. First, let’s have a look again at pciconf before we change anything.
(host) $ pciconf -l | grep iavf
iavf0@pci0:1:0:16:      class=0x020000 rev=0x01 hdr=0x00 vendor=0x8086 device=0x154c
subvendor=0x8086 subdevice=0x0000
iavf1@pci0:1:0:17:      class=0x020000 rev=0x01 hdr=0x00 vendor=0x8086 device=0x154c
subvendor=0x8086 subdevice=0x0000
Look at the unused VF, iavf1. The first column can be read as “there’s a PCI0 device using the driver iavf, ID 1, with a PCI selector of bus 1, slot 0, function 17”. While you don’t need them yet, those last three numbers are how we’ll eventually tell bhyve which device to use. Before we get to that, let’s ensure we load vmm(4) at boot time to enable bhyve, and tweak our second VF so that it’s ready for passthrough to bhyve.
## Load the virtual machine monitor, the kernel portion of bhyve
vmm_load=”YES”

# Another way to passthrough a VF, or any PCI device, is to
# specify the device in /boot/loader.conf. I show this for reference.
# We’ll use our iovctl config instead as it keeps things in one place.
# pptdevs=”1/0/17”
To reserve the VF for passthrough to bhyve, we use the iovctl passthrough parameter.
    passthrough (boolean)
             This parameter controls whether the VF is reserved for the use of
             the bhyve(8) hypervisor as a PCI passthrough device.  If this
             parameter is set to true, then the VF will be reserved as a PCI
             passthrough device and it will not be accessible from the host
             OS.  The default value of this parameter is false.
PF {
        device : “ixl0”
        num_vfs : 2
}

DEFAULT {
        allow-set-mac : true;
}

VF-0 {
        mac-addr : “aa:88:44:00:02:00”;
}

VF-1 {
        mac-addr : “aa:88:44:00:02:01”;
        passthrough : true;
}
When we next boot our system, we’ll find iavf1 absent because the iavf driver will never get assigned to our second VF. Instead it will get marked “ppt” for “PCI passthrough” and only bhyve will be able to make use of it.
With those tweaks, reboot.
Right away you’ll notice dmesg output is different. There is no mention of iavf1 this time. And remember the 1:0:17 selector we saw in pciconf? We see it here with a slightly different format.
ppt0 at device 0.17 on pci1
pciconf confirms that the device is reserved for passthrough.
(host) $ pciconf -l | grep iavf
iavf0@pci0:1:0:16:      class=0x020000 rev=0x01 hdr=0x00 vendor=0x8086 device=0x154c subvendor=0x8086 subdevice=0x0000

(host) $ pciconf -l | grep ppt
ppt0@pci0:1:0:17:      class=0x020000 rev=0x01 hdr=0x00 vendor=0x8086 device=0x154c subvendor=0x8086 subdevice=0x0000
The rest we do in bhyve. This article assumes you know how to get a bhyve virtual machine up and running. I use the vm-bhyve tool for easy management of virtual machines (but see the end of this section for raw bhyve parameters if you don’t use vm-bhyve). I’ll add the ppt VF to a Debian VM called debian-test. All we need to do is define the device we want to passthrough in the config and remove any lines pertaining to virtual networking.
loader=”grub”
cpu=1
memory=4G
disk0_type=”virtio-blk”
disk0_name=”disk0.img”
uuid=”b997a425-80d3-11ee-a522-00074336bc80”

# Passthrough a VF for Networking
passthru0=”1/0/17”

# Common defaults that are not needed with a VF available
# network0_type=”virtio-net”
# network0_switch=”public”
# network0_mac=”58:9c:fc:0c:fd:b7”
All we have to do now is start our bhyve virtual machine.
(host) $ sudo vm start debian-test
Starting debian-test
  * found guest in /mnt/apps/bhyve/debian-test
  * booting...

(host) $ sudo vm console debian-test
Connected

debian-test login: root
Password:
Linux debian-test 6.1.0-16-amd64 #1 SMP PREEMPT_DYNAMIC Debian 6.1.67-1 (2023-12-12) x86_64

root@debian-test:~# lspci | grep -i intel
00:05.0 Ethernet controller: Intel Corporation Ethernet Virtual Function 700 Series
(rev 01)

root@debian-test:~# ip addr
2: enp0s5: <BROADCAST,MULTICAST,UP,LOWER_UP> mtu 1500 qdisc mq state UP group default qlen 1000
    link/ether aa:88:44:00:02:01 brd ff:ff:ff:ff:ff:ff
    inet 10.0.1.99/24 brd 10.0.1.255 scope global dynamic enp0s5
       valid_lft 7186sec preferred_lft 7186sec
    inet6 fdd5:c1fa:4193:245:a888:44ff:fe00:201/64 scope global dynamic mngtmpaddr
       valid_lft 1795sec preferred_lft 1795sec
    inet6 fe80::a888:44ff:fe00:201/64 scope link
       valid_lft forever preferred_lft forever

root@debian-test:~# ping 9.9.9.9
PING 9.9.9.9 (9.9.9.9) 56(84) bytes of data.
64 bytes from 9.9.9.9: icmp_seq=1 ttl=58 time=20.6 ms
64 bytes from 9.9.9.9: icmp_seq=2 ttl=58 time=19.8 ms
Success! We now have an SR-IOV VF device for networking in our bhyve VM.
If you’re a purist and don’t want to use vm-bhyve, details are appended to a vm-bhyve.log file when you use a vm command. In it you will see the parameters that were passed to grub-bhyve and bhyve to start the VM.
create file /mnt/apps/bhyve/debian-test/device.map
      -> (hd0) /mnt/apps/bhyve/debian-test/disk0.img
grub-bhyve -c /dev/nmdm-debian-test.1A -S \
      -m /mnt/apps/bhyve/debian-test/device.map \
      -M 4G -r hd0,1 debian-test
bhyve -c 1 -m 4G -AHP
      -U b997a425-80d3-11ee-a522-00074336bc80 -u -S \
      -s 0,hostbridge -s 31,lpc \
      -s 4:0,virtio-blk,/mnt/apps/bhyve/debian-test/disk0.img \
      -s 5:0,passthru,1/0/17
bhyve PCI passthrough is an emerging feature
While using VFs with vnet for jails is very stable, bhyve PCI passthrough in general is still under heavy development as of 14.0-RELEASE. Using byhve with passthrough alone works great. However, I have found that if I am also using VFs with jails, certain hardware combinations and volumes of devices can create unexpected behavior. Improvements land with each release. If you find an edge case, be sure to submit a bug.
FreeBSD SR-IOV in Summary
To make use of SR-IOV enabled virtual PCIe devices in FreeBSD, we:
- install an SR-IOV capable network card onto an SR-IOV capable motherboard
- ensure the motherboard’s SR-IOV feature is enabled
- create /etc/iov/ixl0.conf and specify how many VFs we want
- reference /etc/iov/ixl0.conf in /etc/rc.conf to persists across boots
And that’s it!
To demonstrate that it worked, we allocated one VF to a jail using vnet. And we pre-allocated another VF at boot-time for passthrough to bhyve virtual machines. In both cases, all we had to do was put a few lines in the respective jail/VM config files.
The following section will contrast the FreeBSD approach compared to what you’ll find in Linux distributions to give you a feel how the two approaches vary.
SR-IOV in Linux
SR-IOV works really well in Linux. Once you’ve got it all setup, you likely won’t be able to find discernible differences between FreeBSD and Linux. Getting it all setup, however, can be a bit of a journey.
The biggest difference is there is no standard tool like FreeBSD’s iovctl for setting up SR-IOV in Linux. There are several ways to achieve a working setup, but they are not so obvious. I’ll highlight how I use udev to setup a Mellanox card’s PF and VFs.
udev is a powerful tool that does a lot of stuff. One of the things it can do is enable SR-IOV devices at boot time. The tool itself is excellent, but knowing what data to feed it is where the challenge lies. Getting the attributes you need will likely require a bit of searching on the Internet, but once you have them the resulting udev rules are very simple.
# DO NOT Probe VFs that will be used for VMs
KERNEL==”0000:05:00.0”, SUBSYSTEM==”pci”, ATTRS{vendor}==”0x15b3”, ATTRS{device}==”0x1015”,
ATTR{sriov_drivers_autoprobe}=”0”, ATTR{sriov_numvfs}=”4”

# DO Probe VFs that will be used for LXD
KERNEL==”0000:05:00.1”, SUBSYSTEM==”pci”, ATTRS{vendor}==”0x15b3”, ATTRS{device}==”0x1015”,
ATTR{sriov_drivers_autoprobe}=”1”, ATTR{sriov_numvfs}=”16”
That essentially says, “match the PCI device 0000:05:00.0 with vendor ID 0x15b3 and device ID 0x1015, and for that device do not try to automatically assign a driver and create 4 VFs” (i.e., reserve for passthrough). The second rule is similar, but targets a different PF, does assign a driver, and creates 16 VFs (i.e., ready for container allocation).
Depending on the card and specific Linux distribution you’re using, those may not be all the attributes you need. For example, if you’re using Fedora you may need to add ENV{NM_UNMANAGED}="1" to avoid NetworkManager taking control of your VFs at boot time.
Similar to pciconf, lspci will get us much of what we need for the matching parts of those rules, which is the PCI address, vendor and device ID. In this system we can see that we have Mellanox ConnectX-4 Lx card.
lspci -nn | grep ConnectX
05:00.0 Ethernet controller [0200]: Mellanox Technologies MT27710 Family [ConnectX-4 Lx] [15b3:1015]
05:00.1 Ethernet controller [0200]: Mellanox Technologies MT27710 Family [ConnectX-4 Lx] [15b3:1015]
The attributes set by udev are visible in /sys/bus/pci/devices/0000:05:00.*/ with many others. Listing the contents of that directory is a good place to go looking for things to tell udev.
(linux) $ ls -AC /sys/bus/pci/devices/0000:05:00.0/
aer_dev_correctable       device            irq               net           resource0                subsystem
aer_dev_fatal             dma_mask_bits     link              numa_node     resource0_wc             subsystem_device
aer_dev_nonfatal          driver            local_cpulist     pools         revision                 subsystem_vendor
ari_enabled               driver_override   local_cpus        power         rom                      uevent
broken_parity_status      enable            max_link_speed    power_state   sriov_drivers_autoprobe  vendor
class                     firmware_node     max_link_width    ptp           sriov_numvfs             virtfn0
config                    hwmon             mlx5_core.eth.0   remove        sriov_offset             virtfn1
consistent_dma_mask_bits  infiniband        mlx5_core.rdma.0  rescan        sriov_stride             virtfn2
current_link_speed        infiniband_verbs  modalias         reset         sriov_totalvfs           virtfn3
current_link_width        iommu             msi_bus           reset_method  sriov_vf_device          vpd
d3cold_allowed            iommu_group       msi_irqs          resource      sriov_vf_total_msix
In that listing, we see our two udev targets, sriov_drivers_autoprobe and sriov_numvfs, which we want to set at boot time. What does everything else do? You’ll probably need your favorite search engine to answer that question.
With udev we’ve accomplished step 1 of 2 major steps. It effectively “turns on” the hardware SR-IOV capability. We need to still need to configure it for networking use, which is major step 2. This varies a great deal depending on whatever we’re using to manage networking. For example, if you use systemd-networkd, you’d do something like this.
#/etc/systemd/network/21-wired-sriov-p1.network
[Match]
Name=enp5s0f1np1

[SR-IOV]
VirtualFunction=0
Trust=true

[SR-IOV]
VirtualFunction=1
Trust=true
Luckily, for systemd-networkd, the documentation isn’t so bad and you can find most of what you need. With that, we restart the service and the VFs are ready to use.
But not all documents are great, and aside from the networking software itself, security overlays like AppArmor and selinux can create hard to detect blockers that are technically doing what they’re supposed to do, but will very much make the system feel like it’s not functioning.
As a specific example of frustration, I was recently using Fedora 39 to run a handful of LXD containers. I found notes to set ENV{NM_UNMANAGED}="1" in udev and that did the trick to let LXD manage my VFs. Everything worked fine until I rebooted the containers several times. Suddenly LXD started complaining that there were no VFs.
It turns out that while the udev rule stopped NetworkManager from managing VFs at boot time, NetworkManager was intercepting them at runtime when containers were restarting and taking over management of them. I realized something strange was happening because VF device names were changing after restarting containers. For example, what started as enp5s0f0np0 would become something like physZqHm0g once the container it was assigned to restarted.
Eventually, I was able to find a way to tell NetworkManager not to do this. The critical config file I had to create to stop the LXD+NM battle is below, just in case you were wondering.
[keyfile]
unmanaged-devices=interface-name:enp5s0f1*,interface-name:phys*
This is just one example. Thinking you have everything working only to find out days later things are actually slowly self-destructing is not a good experience. In general, I find all frustrations have the same root cause: no existing or emerging standard way to configure SR-IOV in the Linux ecosystem. Once you get over the not-so-obvious setup hurdles, SR-IOV for networking with Linux works just fine.
Conclusion
SR-IOV is a first class citizen in FreeBSD. Everything mentioned in this article you can find using the OS-provided manual pages. Start with a simple apropos(1) query.
(host) $ apropos “SR-IOV”
iovctl(8) - PCI SR-IOV configuration utility
The iovctl manual will get you started and the driver pages will give you the specifics for your hardware. When things are apparent and easy to find, system administration doesn’t feel like a chore.
Linux distributions are equally capable, but lacking in terms of cohesion and in-system documentation for SR-IOV. While I rely on Linux for all sorts of things, I truly appreciate the organization of configuration in FreeBSD. It’s easy to come back to a system I haven’t touched in a year and quickly understand what I’ve done. I far prefer this over taking detailed notes with obscure URLs to comments on discussion boards where some saint posted the way to make something work.
As with anything, make your own informed choice for what best suits your needs.
