The kernel is like any other software and is developed with the typical workflow of clone, edit, build, test, debug, commit. But unlike userspace software, kernel development necessarily involves repeated reboots (and lockups, and panics) and is inconvenient without a dedicated test system. This article describes a practical setup for kernel development that uses virtual machines for testing and debugging.
A VM based setup for kernel development has a number of advantages:
- Isolation. The host system is not affected by a VM reboot or crash.
- Speed. A VM reboots much faster than a bare metal system.
- Debuggability. VMs are easy to setup for live source-level kernel debugging.
- Flexibility. VMs can be used to build a “network in a box” for working on networking code without an actual physical network. eg. on a laptop in an airplane.
- Manageability. VMs are easy to create, reconfigure, clone, and move.
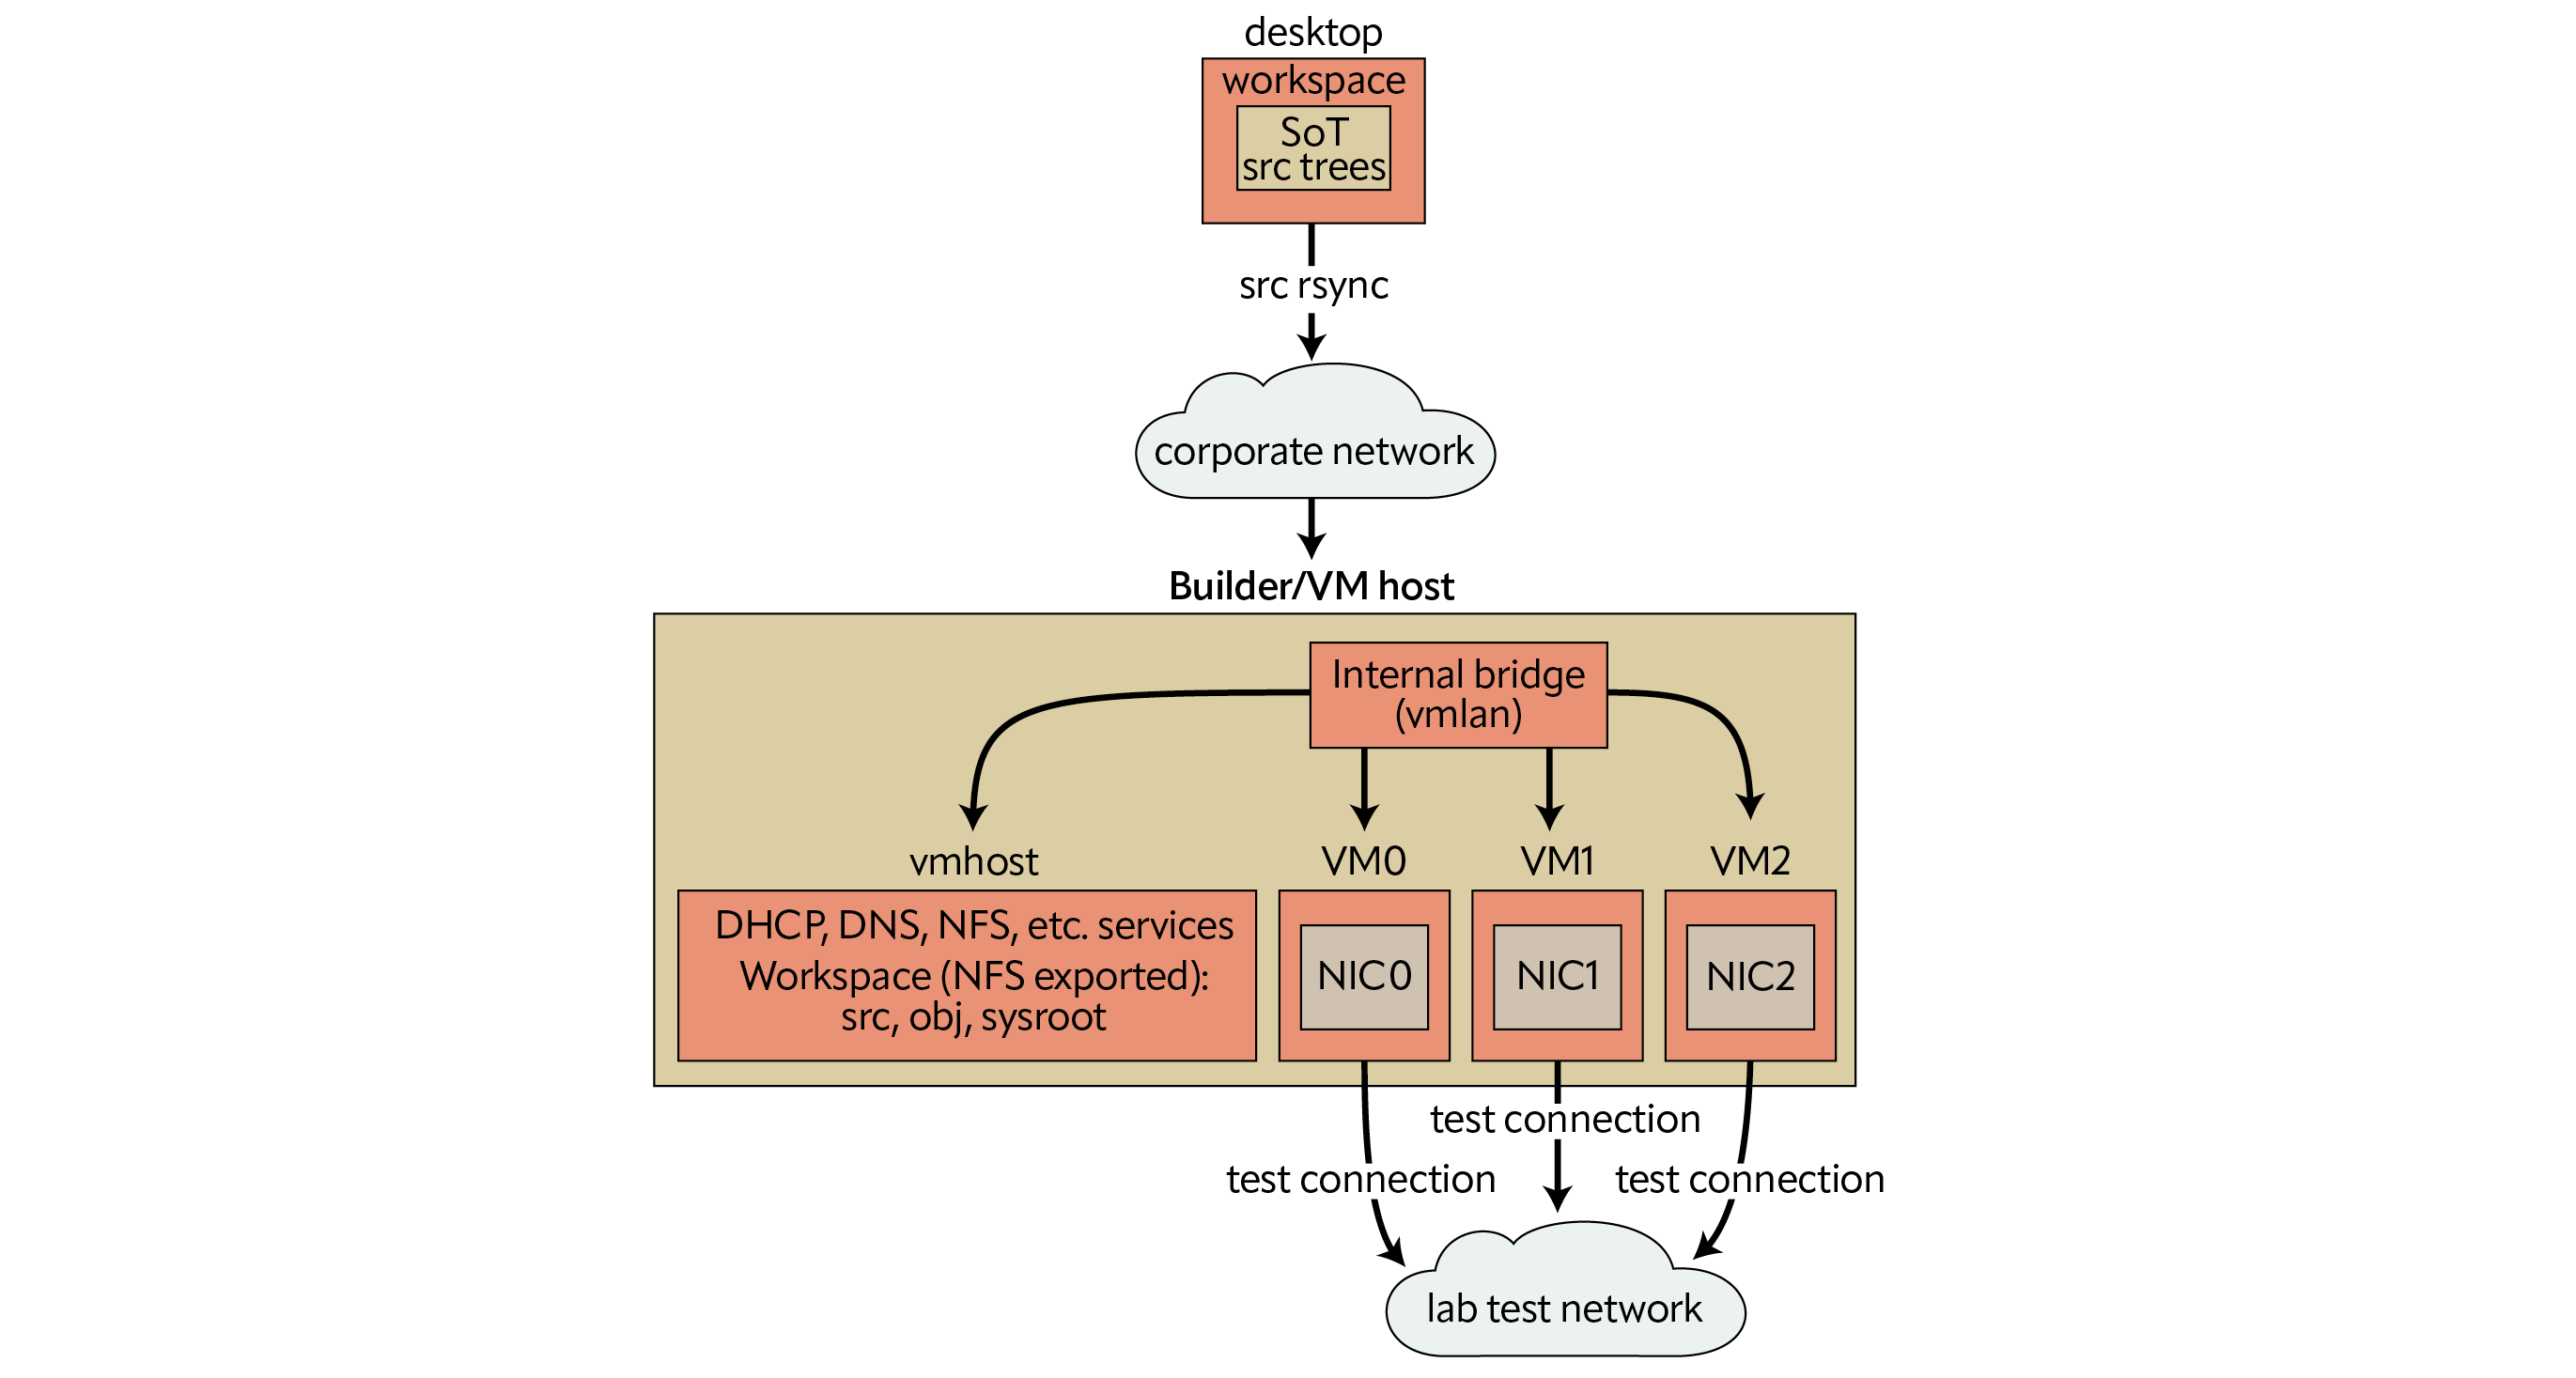
Overview
The system used to build the kernel also runs test VMs, all of which are connected to an internal bridge. The host provides DHCP, DNS, and other services to the IP network configured on the bridge. The source tree and build artifacts are all within a self-contained work area on the host which is exported to this internal network. The work area is mounted inside the test VM and a new test kernel is installed from there. The VMs have an extra serial port configured for remote kernel debugging, with the gdb stub in the VM’s kernel connected to the gdb client on the host system over a virtual null modem cable.
The simplest way to set it up is to use a single system, typically a laptop or workstation, for everything. This is the most portable development environment of all but the system must have enough resources (CPU, memory, and storage) to build a FreeBSD source tree and to run the VMs.
In work environments it is more common to have dedicated servers in the lab for development and testing, separate from the developer’s workstation. Server class systems have higher specs than desktops and are better suited for building source code and running VMs. They also offer a wider variety of PCIe expansion slots and are suited for PCIe device driver development.
Configuration
The rest of this article assumes a two system setup and uses the hostnames ‘desktop’ and ‘builder’ to refer to them. The primary copy of the source code is on the desktop, where it is edited by the user and then synced to the builder. The rest takes place on the builder, as root. The builder is also known as ‘vmhost’ on its internal network.
WS=dev
DWSDIR=~/work/ws
WSDIR=/ws
All the checked out trees on the desktop are assumed to be in their own directory ${WS} in a common parent directory ${DWSDIR}. The examples use the workspace ‘dev’ in the ‘~user/work/ws’ directory. The ${WSDIR} directory on the builder is the self-contained work area with build configuration files, source trees, a shared obj directory, and a sysroot for gdb. The examples use the location ‘/ws’ on the builder.
Desktop Setup
Source Tree
The FreeBSD source code is available in a git repository at https://git.FreeBSD.org/src.git. New development takes place in the main branch and changes applicable to recent stable branches are merged back from main after a soak-in period.
Create a local working copy by cloning a branch from the official repository or a mirror.
desktop# pkg install git

desktop$ git ls-remote https://git.freebsd.org/src.git heads/main heads/stable/*

desktop$ git clone --single-branch -b main ${REPO} ${DWSDIR}/${WS}
desktop$ git clone --single-branch -b main https://git.freebsd.org/src.git ~/work/ws/dev
Custom KERNCONF for Development
Every kernel is built from a plain text kernel configuration (KERNCONF) file. Traditionally a kernel’s ident string (the output of ‘uname -i’) matches the name of its configuration file. eg. the GENERIC kernel is built from a file named GENERIC. There are a number of KERNCONF options for debugging and diagnostics and it is useful to have them enabled during early development. The GENERIC configuration in the main branch already has a reasonable subset enabled and is suitable for development work. However, modern compilers seem to optimize away variables and other debug information aggressively, even at low optimization levels, and it is sometimes useful to build a kernel with all optimizations disabled. Use the custom KERNCONF shown here, called DEBUG0, for this purpose. It is almost always simpler to include an existing configuration and use nooptions/options and nomakeoptions/makeoptions to make adjustments, instead of writing one from scratch.
The DEBUG makeoptions is added to the compiler flags for both the kernel and the modules. The stack size needs to be increased to accomodate the larger stack footprint of unoptimized code.
desktop$ cat ${DWSDIR}/${WS}/sys/amd64/conf/DEBUG0
desktop$ cat ~/work/ws/dev/sys/amd64/conf/DEBUG0
include GENERIC
ident DEBUG0
nomakeoptions DEBUG
makeoptions DEBUG=”-g -O0”
options KSTACK_PAGES=16
Getting the Source Tree to the Builder
Copy the source tree to the builder, where it will be built as root. Remember to synchronize the contents after making changes on the desktop but before building on the builder.
desktop# pkg install rsync

desktop$ rsync -azO --del --no-o --no-g ${DWSDIR}/${DWS} root@builder:${WSDIR}/src/
desktop$ rsync -azO --del --no-o --no-g ~/work/ws/dev root@builder:/ws/src/
Builder Setup
Build Configuration
Create make.conf and src.conf files in the workspace area on the builder instead of modifying the global configuration files in /etc. The obj directory is also in the workspace area and not /usr/obj. Use meta mode for fast incremental rebuilds. Meta mode requires filemon. All the kernels in the KERNCONF= list will be built by default and the first one will be installed by default. It is always possible to provide a KERNCONF on the command line and override the default.
builder# kldload -n filemon
builder# sysrc kld_list+=”filemon”

builder# mkdir -p $WSDIR/src $WSDIR/obj $WSDIR/sysroot
builder# mkdir -p /ws/src /ws/obj /ws/sysroot

builder# cat $WSDIR/src/src-env.conf
builder# cat /ws/src/src-env.conf
MAKEOBJDIRPREFIX?=/ws/obj
WITH_META_MODE=”YES”
builder# cat /ws/src/make.conf
KERNCONF=DEBUG0 GENERIC-NODEBUG
INSTKERNNAME?=dev
builder# cat /ws/src/src.conf
WITHOUT_REPRODUCIBLE_BUILD=”YES”
Networking Configuration
Identify an unused network/mask for use as the internal network. The examples use 192.168.200.0/24. The first host (192.168.200.1) is always the VM host (the builder). Host numbers with two digits are reserved for known VMs. Host numbers with three digits 100 are handed out by the DHCP server to unknown VMs.
- Create a bridge interface for use as a virtual switch that connects all the VMs and the
host.Assign a fixed IP address and hostname to the bridge.builder# echo ‘192.168.200.1 vmhost’ >> /etc/hosts
builder# sysrc cloned_interfaces=”bridge0”
builder# sysrc ifconfig_bridge0=”inet vmhost/24 up”
builder# service netif start bridge0 - Configure the host to perform IP forwarding and NAT for its VMs. This is strictly optional and should be done if and only if the VMs need access to the external network. The public interface is igb1 in the example here.
builder# cat /etc/pf.conf
ext_if=”igb1”
int_if=”bridge0”
set skip on lo
scrub in
nat on $ext_if inet from !($ext_if) -> ($ext_if)
pass out
builder# sysrc pf_enable=”YES”

builder# sysrc gateway_enable=”YES” - Start ntpd on the host. The DHCP server will offer itself as an ntp server to the VMs.
builder# sysrc ntpd_enable=”YES”
builder# service ntpd start - DHCP and DNS.
Install dnsmasq and configure it as a DHCP and DNS server for the internal network.builder# pkg install dnsmasq
builder# cat /usr/local/etc/dnsmasq.conf
no-poll
interface=bridge0
domain=vmlan,192.168.200.0/24,local
host-record=vmhost,vmhost.vmlan,192.168.200.1
synth-domain=vmlan,192.168.200.100,192.168.200.199,anon-vm*
dhcp-range=192.168.200.100,192.168.200.199,255.255.255.0
dhcp-option=option:domain-search,vmlan
dhcp-option=option:ntp-server,192.168.200.1
dhcp-hostsfile=/ws/vm-dhcp.conf
Add it as the first nameserver in the local resolv.conf. The dnsmasq resolver will service queries from the internal network and the builder’s loopback interface only.builder# sysrc dnsmasq_enable=”YES”
builder# service dnsmasq start
builder# head /etc/resolv.conf
search corp-net.example.com
nameserver 127.0.0.1
... - Export the entire work area to the internal network.
builder# cat /etc/exports
V4: /ws
/ws -ro -mapall=root -network 192.168.200.0/24
builder# sysrc nfs_server_enable=”YES”
builder# sysrc nfsv4_server_only=”YES”
builder# service nfsd start
vm-bhyve (bhyve Frontend)
vm-bhyve is an easy to use frontend for bhyve.
Identify a ZFS pool for use with the VMs and create a dataset for vm-bhyve on the pool. Specify the name of this pool and dataset in vm_dir in rc.conf. Initialize vm-bhyve once vm_dir is set properly.
builder# kldload -n vmm
builder# kldload -n nmdm
builder# sysrc kld_list+=”vmm nmdm”
builder# pkg install vm-bhyve
builder# zfs create rpool/vm
builder# sysrc vm_dir=”zfs:rpool/vm”
builder# vm init
builder# sysrc vm_enable=”YES”
builder# service vm start
All the VMs will use a serial console in text mode, accessible using tmux.
builder# pkg install tmux
builder# vm set console=tmux
Add the previously created bridge interface as a vm-bhyve switch.
builder# vm switch create -t manual -b bridge0 vmlan
Establish reasonable defaults for new VMs. Edit the default template at $vm_dir/.templates/default.conf as needed. Specify at least 2 serial ports—one for the serial console and one for remote debugging. Connect all new VMs to the vmlan switch.
builder# vim /rpool/vm/.templates/default.conf
loader=”uefi”
cpu=2
memory=2G
comports=”com1 com2”
network0_type=”virtio-net”
network0_switch=”vmlan”
disk0_size=”20G”
disk0_type=”virtio-blk”
disk0_name=”disk0.img”
Seed Images
The easiest way to have FreeBSD up and running in a new VM is to seed it with a disk image that has it preinstalled. The VM will boot its default kernel or a dev kernel and its userspace needs to work with both so it is best to use the same version of FreeBSD in the VM as the dev tree.
Disk images for releases and for recent snapshots of the main and stable branches are available from FreeBSD.org.
# fetch https://download.freebsd.org/releases/VM-IMAGES/14.0-RELEASE/amd64/Latest/FreeBSD-14.0-RELEASE-amd64.raw.xz
# fetch https://download.freebsd.org/snapshots/VM-IMAGES/15.0-CURRENT/amd64/Latest/FreeBSD-15.0-CURRENT-amd64.raw.xz

# unxz -c FreeBSD-14.0-RELEASE-amd64.raw.xz > seed-14_0.img
# unxz -c FreeBSD-15.0-CURRENT-amd64.raw.xz > seed-main.img
# du -Ash seed-main.img; du -sh seed-main.img
6.0G    seed-main.img
1.6G    seed-main.img
Disk images can also be generated from a source tree. This example shows how to build an image with a non-debug kernel and some other space-saving options.
# cd /usr/src
# make -j1C KERNCONF=GENERIC-NODEBUG buildworld buildkernel
# make -j1C -C release WITH_VMIMAGES=1 clean obj
# make -j1C -C release WITHOUT_KERNEL_SYMBOLS=1 WITHOUT_DEBUG_FILES=1 \
     NOPORTS=1 NOSRC=1 WITH_VMIMAGES=1 VMFORMATS=raw VMSIZE=4g SWAPSIZE=2g \
     KERNCONF=GENERIC-NODEBUG vm-image

# cp /usr/obj/usr/src/amd64.amd64/release/vm.ufs.raw seed-main.img
# du -Ash seed-main.img; du -sh seed-main.img
6.0G    seed-main.img
626M    seed-main.img
Modify the vanilla image for use as a test VM on the internal network.
Create a memory disk from the image and mount the UFS partition. This will be the preinstalled OS’s root partition when it boots inside the VM.
# mdconfig -af seed-main.img
md0
# gpart show -p md0
# mount /dev/md0p4 /mnt
Remove hostname from rc.conf to force the one provided by the DHCP server to be used.
# sysrc -R /mnt -x hostname
# sysrc -R /mnt -x ifconfig_DEFAULT
# sysrc -R /mnt ifconfig_vtnet0=”SYNCDHCP”
# sysrc -R /mnt ntpd_enable=”YES”
# sysrc -R /mnt ntpd_sync_on_start=”YES”
# sysrc -R /mnt kld_list+=”filemon”
Enable ssh access to the VM out of the box. Note that this is a development environment inside a lab network and there are no concerns about operating as root or reusing the same host keys. Copy the host keys and root’s .ssh to the correct locations. It is convenient to use the same keys on all the VMs. Update the sshd configuration to allow root to login and enable the service.
# cp -a .../vm-ssh-hostkeys/ssh_host_*key* /mnt/etc/ssh/
# cp -a .../vm-root-dotssh /mnt/root/.ssh
# vim /mnt/etc/sshd_config
PermitRootLogin yes
# sysrc -R /mnt sshd_enable=”YES”
Configure the first serial port as a potential console and the second one for remote kernel debugging.
# vim /mnt/boot/loader.conf
kern.msgbuf_show_timestamp=”2”
hint.uart.0.flags=”0x10”
hint.uart.1.flags=”0x80”
Create the mount point for the work area and add an entry in fstab to mount it on boot. /dev/fd and /proc are useful in general.
# mkdir -p /mnt/ws
# vim /mnt/etc/fstab
...
fdesc   /dev/fd fdescfs rw      0       0
proc    /proc   procfs  rw      0       0
vmhost:/ /ws nfs ro,nfsv4 0 0
All done. Unmount and destroy the md.
# umount /mnt
# mdconfig -du 0
seed-main.img file is ready for use.
New Test VM
Create a new VM and note its auto-generated MAC address. Update the configuration so that the DHCP service provides the assigned hostname and IP address to known VMs. These statically assigned addresses must not overlap with the dhcp-range. The convention in this article is to use 2 digit host numbers for known VMs and 3 digit host numbers for dynamic dhcp-range.
Create a ‘dhcp-host’ entry with the hostname assigned to the VM, its MAC address, and a fixed IP that is not from the dynamic range. Then reload the resolver.
builder# vm create vm0
builder# vm info vm0 | grep fixed-mac-address
builder# echo ‘vm0,58:9c:fc:03:40:dc,192.168.200.10’ >> /ws/vm-dhcp.conf
builder# service dnsmasq reload
Replace the disk0.img file with a copy of the seed image and increase its size to the desired disk size for the VM. A VM’s disk image can be resized this way any time the VM is not running. Run “service growfs onestart” in the VM the first time it boots with a resized disk.
builder# cp seed-main.img /rpool/vm/vm0/disk0.img
builder# truncate -s 30G /rpool/vm/vm0/disk0.img
First Boot
Review the VM’s configuration before first boot.
builder# vm configure vm0
Start the VM with its console in the foreground, or start it in the background and then attach to its console. The console is just a tmux session named after the VM.
builder# vm start -i vm0

builder# vm start vm0
builder# vm console vm0
Verify the following the first time a VM boots:
- The VM’s hostname is the one assigned by the DHCP server. The hostname and tty are visible on the console in the login prompt.
FreeBSD/amd64 (vm0) (ttyu0)
login: - The VM’s uart0 is the console and uart1 is for remote debugging.
vm0# dmesg | grep uart
[1.002244] uart0: console (115200,n,8,1)
...
[1.002252] uart1: debug port (115200,n,8,1) - The work area is mounted at the expected location.
vm0# mount | grep nfs
vmhost:/ on /ws (nfs, read-only, nfsv4acls)
vm0# ls /ws
... - The VM is reachable over ssh from the host and from the desktop (using the VM host as the jump host).
builder# ssh root@vm0

desktop$ ssh -J root@builder root@vm0
PCIe Device Driver Development in a VM
PCI passthrough allows the host to export (pass through) PCIe devices to a VM, giving it direct access to the PCIe device. This makes it possible to do device driver development for real PCIe hardware inside a VM.
The device is claimed by the ppt driver on the host and appears inside the VM as if connected to the VM’s PCIe root complex. The PCIe devices on a system are identified with a BSF (or BDF) 3-tuple and it may be different inside the VM.
Use pciconf or vm-bhye to get a list of PCIe devices on the system and note the BSF tuple for the ones to pass through. Note that the pciconf selector ends with BSF separated by colons whereas bhyve/vmm/ppt use B/S/F (separted by forward slash) to identify a device. eg. the PCIe device with the selector “none193@pci0:136:0:4” is “136/0/4” in the bhyve/ppt notation.
builder# pciconf -ll
builder# vm passthru
Have the ppt driver claim the devices that will be passed through. This prevents the normal driver from attaching to the device.
builder# vim /boot/loader.conf
pptdevs=”136/0/4 137/0/4”
Reboot so that the loader.conf changes take effect, or try to detach the device from its driver and attach it to ppt while the system is running.
builder# devctl detach pci0:136:0:4
builder# devctl clear driver pci0:136:0:4
builder# devctl set driver pci0:136:0:4 ppt
(repeat for 137)
Verify that the ppt driver attached to the devices and vm-bhyve is ready to use them.
builder# pciconf -ll | grep ppt
ppt0@pci0:136:0:4:      020000   00   00   1425   640d   1425   0000
ppt1@pci0:137:0:4:      020000   00   00   1425   640d   1425   0000
builder# vm passthru | awk ‘NR == 1 || $3 != “No” {print}’
DEVICE     BHYVE ID     READY        DESCRIPTION
ppt0       136/0/4      Yes         T62100-CR Unified Wire Ethernet Controller
ppt1       137/0/4      Yes          T62100-CR Unified Wire Ethernet Controller
Reconfigure the test VM and list the devices that should be passed through to that VM.
builder# vm configure vm0
passthru0=”136/0/4”
passthru1=”137/0/4”
Start the test VM and verify that the PCIe devices are visible. Note that the BSFs in the VM are different from the actual hardware BSFs in the host.
vm0# pciconf -ll
...
none0@pci0:0:6:0:       020000   00   00   1425   640d   1425   0000
none1@pci0:0:7:0:       020000   00   00   1425   640d   1425   0000
...
Main Workflow Loop (edit, build, install, test, repeat)
Edit
Edit the source tree on the desktop and sent it to the builder.
desktop$ cd ~/work/ws/dev
desktop$ gvim sys/foo/bar.c
...
desktop$ rsync -azO --del --no-o --no-g ~/work/ws/dev root@builder:/ws/src/
Build
builder# alias wsmake=’__MAKE_CONF=${WSDIR}/src/make.conf SRC_ENV_CONF=${WSDIR}/src/src-env.conf SRCCONF=${WSDIR}/src/src.conf make -j1C’
builder# alias wsmake=’__MAKE_CONF=/ws/src/make.conf SRC_ENV_CONF=/ws/src/src-env.conf SRCCONF=/ws/src/src.conf make -j1C’

builder# cd ${WSDIR}/src/${WS}
builder# cd /ws/src/dev
builder# wsmake kernel-toolchain (one time)
builder# wsmake buildkernel
Install
- Install kernel in the VM. INSTKERNNAME is set in make.conf so the test kernel in /boot/${INSTKERNNAME} will not interfere with the stock kernel in /boot/kernel, which is the safe fallback if there are problems with the test kernel. It can be specified explicitly on the command line too.
vm0# alias wsmake=’__MAKE_CONF=${WSDIR}/src/make.conf SRC_ENV_CONF=${WSDIR}/src/src-env.conf SRCCONF=${WSDIR}/src/src.conf make -j1C’
vm0# alias wsmake=’__MAKE_CONF=/ws/src/make.conf SRC_ENV_CONF=/ws/src/src-env.conf SRCCONF=/ws/src/src.conf make -j1C’

vm0# cd ${WSDIR}/src/${WS}
vm0# cd /ws/src/dev
vm0# wsmake installkernel - Install to the builder’s sysroot too if gdb on the builder will be used for source level debugging. Use the same INSTKERNNAME and KERNCONF as in the VM.
builder# cd /ws/src/dev
builder# wsmake installkernel DESTDIR=/ws/sysroot
Test
Select the test kernel for the next reboot only, or permanently.
vm0# nextboot -k ${WS}
vm0# nextboot -k dev
vm0# shutdown -r now

vm0# sysrc -f /boot/loader.conf kernel=”${WS}”
vm0# sysrc -f /boot/loader.conf kernel=”dev”
vm0# shutdown -r now
It is a good practice to use a debug KERNCONF (eg. the custom DEBUG0 shown earlier or the GENERIC in main) for initial testing and later switch to a release kernel (eg. the GENERIC-NODEBUG in main).
Debugging the Test Kernel
Verify that the test kernel is running currently.
vm0# uname -i
DEBUG0
vm0# sysctl kern.bootfile
kern.bootfile: /boot/dev/kernel
Backends
There are two debugger backends available and the current backend can be changed on the fly.
vm0# sysctl debug.kdb.available
vm0# sysctl debug.kdb.current

vm0# sysctl debug.kdb.current=ddb
vm0# sysctl debug.kdb.current=gdb
Breaking into the Debugger
- Automatically, on a panic. If this sysctl is set the kernel will enter the debugger (instead of rebooting) on panic.
vm0# sysctl debug.debugger_on_panic - Manually, from inside the VM.
vm0# sysctl debug.kdb.enter=1 - Manually, from the VM host. Inject an NMI into the VM if it is locked up and not responding.
builder# bhyvectl --vm=vm0 --inject-nmi
Source Level Debugging with gdb
Source level debugging requires the source code, binaries, and debug files, all of which are available on both the host and the VMs, but at different locations.
Live Remote Debugging
Make sure that the debug backend is set to gdb. If the VM has already entered the debugger with the ddb backend, switch to the gdb backend interactively.
vm0# sysctl debug.kdb.current=gdb

db> gdb
The remote gdb stub in the kernel is active when the kernel enters the debugger. Connect to the gdb stub from the host. The connection takes place over a virtual null modem cable connected to the VM’s second serial port (uart1 inside the VM).
builder# gdb -iex ‘set sysroot ${WSDIR}/sysroot’ -ex ‘target remote /dev/nmdm-${VM}.2B’ ${WSDIR}/sysroot/boot/${INSTKERNNAME}/kernel
builder# gdb -iex ‘set sysroot /ws/sysroot’ -ex ‘target remote /dev/nmdm-vm0.2B’ /ws/sysroot/boot/dev/kernel
Core Dump Analysis
Same as live debug except the target is a vmcore instead of remote.
builder# gdb -iex ‘set sysroot ${WSDIR}/sysroot’ -ex ‘target vmcore ${VMCORE}’ ${WSDIR}/sysroot/boot/${INSTKERNNAME}/kernel

builder# scp root@vm0:/var/crash/vmcore.0 /ws/tmp/
builder# gdb -iex ‘set sysroot /ws/sysroot’ -ex ‘target vmcore /ws/tmp/vmcore.0’ /ws/sysroot/boot/dev/kernel