Embedded FreeBSD: Breadcrumbs
I’ve been using FreeBSD for almost 3 decades now. I first installed FreeBSD in the early 1990s because the package system made it really easy to install versions of the free CAD software I was using at the time to build my first silicon chips in 2 micron (2000nm, that’s not a typo). Not having to figure out how to configure and compile 3 or 4 packages myself meant I could install the system in an evening and literally do chip design in my basement. Before that I would have to drive all the way to the university and spend hours each day working late into the night on the expensive Sun workstations. Not only could I do everything at home, but the tools also ran faster to boot! While I can program, I’ve always used FreeBSD as a base on which to do computing. I never developed for the community. Now, I want to build something with FreeBSD, not simply use FreeBSD to get my work done.
There is a plethora of small, embedded boards on the market — some with great mindshare. The raspberry pi in all its incarnations is a wonderful example. For me the most interesting thing about these small, embedded boards is their ability to interface with the outside world. Many of these small boards have GPIO pins that you can toggle from the CPU and thus interface to all sorts of real-world things. But I’m a hardware engineer at heart; I really want to build hardware. While I’ve done well in my career, I still don’t have the spare $10 Billion dollars I’d need to build my own fab or the millions of dollars I’d need to buy EDA (Electronic Design Automation) software to design my own chips. There are some interesting projects out there now if you want to build your own silicon, but I started this journey before I found those. I always thought to myself, yes, I could buy an rpi or any of the other great boards out there like the Arduino, but what would I do with them? So, I continued to read about these board but never dipped my toe in. Finally, I found the board for me.
Xilinx, now AMD, produces an inexpensive set of chips they call Zynq. These chips have single or dual AMD Coretex A9 CPUs complete with MMUs and a host of peripherals built into them. These chips, while not open source, are well documented from a hardware perspective. Most importantly someone (Thomas Skibo) had already done all the hard work to port FreeBSD to them. Like I said, I’m a hardware engineer at heart, and while I like writing software, porting FreeBSD from scratch was just a bigger project than I wanted to chew on at that point. There are a variety of boards with this chip (ZYBO, ZEDBOARD, ARTYZ7) at varying price points — some as low as around $200. But the most import thing for me as a hardware engineer was that these chips have an FPGA fabric built into them and connected to the CPU.
For those of you who don’t know what FPGAs are, you can think of them as the halfway house between CPUs and full custom chips (ASICs). FPGA is an acronym for Field Programmable Gate Arrays. In their basic incarnation they are a large array of gates that can be interconnected to form a circuit. You’ll often hear this array of gates and their interconnect network referred to as a fabric. FPGA circuits are usually designed in a language called Verilog (or VHDL) which is the same language that is used in the design of full-custom silicon ASICs. The flow of tools used to build FPGA designs is very similar to ASIC design. It’s very flexible but can also be very complex. And while Verilog looks much like C, it’s really a different mindset altogether.
One of the advantages of using the Xilinx/AMD Zynq chips is that Xilinx provides a basic set of tools to target the Zynq fabric free of charge. The downside is it only runs under Windows or Linux. In the context of full-custom ASIC design, these tools could cost millions.
For me, this presents a wonderful starting point. I can buy a relatively cheap board with a Zynq chip. It is fairly well documented from a hardware perspective. It already runs FreeBSD. Tools to do designs in the fabric are free. I can concentrate on what’s really interesting to me: designing hardware and building the drivers and software to talk to it. There is an amazing number of possibilities.
The figure shows a block diagram of the processor subsystem of the Zynq chip. As you can see it comes complete with a variety of hardware blocks to interface to the outside world including i2C, SPI, CAN, UART, USB, and Gigabit Ethernet. All these blocks are there out of the box without any programming of the fabric and make the Arty Z7 a fine board to use even without designing any hardware.
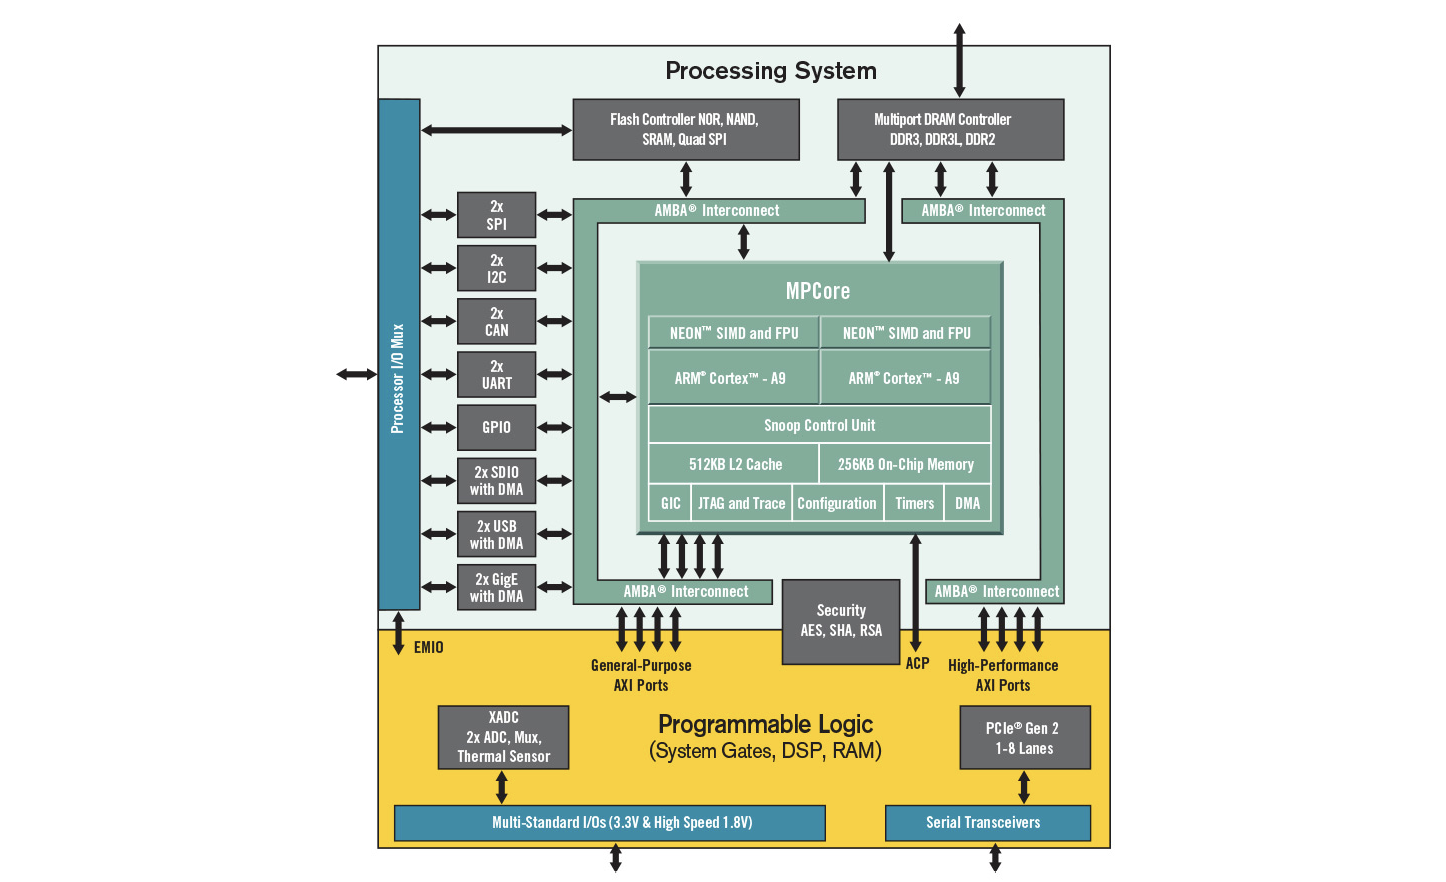
Zynq Z7000-20 processor subsystem block diagram
While there are many Zynq boards the one I chose is the Digilent Arty Z7-20, not to be confused with the Digilent Arty A7 which uses a different chip that is all fabric and no processor subsystem. The Arty Z7-20 has dual ARM Cortex A9 processors (the Z7-10 has only one core) which I would guess are about as powerful as the Pentium Pros I ran decades ago, but hey what do you want in an embedded board? These cores are fully supported under LLVM running on FreeBSD. Also included is 512MB of DDR3 memory running over a 16-bit bus at 1050 MBps. The board has an Arduino/chipKIT Shield connector which allows you to easily connect any Arduino shield. It also has a couple of PMOD ports which like the Arduino shield connector is a standardized connector for external peripherals. There is a wide variety of PMOD devices listed on the Digilent site that you can buy cheaply and easily. The board includes a pair of HDMI ports, one in and one out, connected to the fabric. It also has a gigabit ethernet port that functions under FreeBSD. There are USB ports (that I’ve never tried) and a variety of LEDS, switches and buttons all connected to the fabric. The Zynq chip itself also contains dual ADCs (Analog to Digital Converters) allowing you to sample external signals. System storage is a standard MicroSD card up to 32 Gigabytes in size. If you never touched the fabric, you’d have a fairly complete and capable embedded board. Heck it’s better than what I was running FreeBSD on when I started in the 1990s!
Booting the Arty Z7 board is simple. I use dd to copy a prebuilt image (you can find my 14.1 RELEASE one HERE) to a MicroSD card using a cheap USB to SD card adaptor. Note that cards larger than 32 gigabytes aren’t supported. When a card is inserted into my system, a device /dev/da0 shows up. This may be slightly different on your system if you already have a /dev/da0 device. You can easily see which device to use by listing the da devices in /dev before and after inserting a card. The following copies over an image:
# dd if=FreeBSD-armv7-14.1R-ARTY_Z7-49874af3.img \
of=/dev/da0 bs=1m status=progress
Meanwhile, I plug one end of a USB cable into the Arty micro-B USB connector and the other end into my FreeBSD machine. Then fire up a serial terminal program, connect to the appropriate device and set it for 115kpbs 8-N-1.
# cu -s 115200 -l /dev/ttyU1
When the image copy is complete, I insert the SD card into the Arty board and press the reset button. Make sure you setup the serial terminal before you hit reset so that you get to enjoy the entire FreeBSD boot sequence. Within seconds, I have a tiny but fully functional Unix host sitting on the network ready to start my quest for world domination!
Since the image I use comes preconfigured with DHCP on the ethernet port and with a preconfigured user account and ssh keys, I can simply connect the board to my ethernet switch, add the board’s MAC to my DHCP, create a DNS entry and SSH into the board using its DNS name.
Right there it’s a small, relatively cheap, full-fledged Unix host. You could host services like DHCP/DNS/NTP. You could use it for network intrusion. Possibilities are endless, but we haven’t even scratched the surface yet, as we haven’t even talked about using the external pins or the fabric. And that will be the focus of a future column.
Are you using these boards? Which one? What are you using it for. I’d love to hear your comments and feedback.