
Kick Me Now with Webhooks
What Is a Webhook And Why Would I Want One?
A webhook is an event-driven remote callback protocol over HTTP allowing scripts and tasks to be trivially invoked from almost any programming language or tool. What’s great about webhooks is their prevalence and their simplicity. With a simple HTTP URL, you can request a remote server to dim the lights, deploy code, or run an arbitrary command on your behalf.
The simplest of webhooks can just be a bookmarked link in a smart phone web browser, or a more complicated version might require strong authentication and authorization.
While larger automation toolsets exist, such as Ansible and Puppet, sometimes something simpler is sufficient. Webhooks are just such a thing, allowing you to run a task on a remote computer, on request, securely. Invoking a webhook can be considered “kicking,” hence the article title.
Integrations
There are no official standards yet, however commonly, webhooks are sent via POST with a JSON object body, using TLS encryption, often secured with signatures against tampering, network forgery, and replay attacks.
Common integrations include Chat services such as Mattermost, Slack, and IRC, software forges like Github and Gitlab, generic hosted services like Zapier or IFTT, and many home automation suites like Home Assistant as well. The sky’s the limit, as webhooks are sent and received almost everywhere.
While you could write a minimal webhook client or server in an hour, there are many options already available in almost every programming language today. Chat software often provides inbuilt webhook triggers that can be invoked by users, often by a /command style syntax. IRC servers are not forgotten either, mostly via daemons or plugins.
One less obvious advantage for webhooks is the ability to demarcate security and privileges. A low-privileged user can call a webhook on a remote system. The remote webhook servce can run also at a low privilege, managing validation and basic syntax checking, before invoking a higher privilege task once the requirements have been verified. Perhaps the final task has access to a privileged token that allows rebooting a service, deploying new code, or letting the kids have another hour of screen time.
Common software forges such as GitHub, GitLab, and self hosted options also provide these such that they can be triggered including the name of the branch, the commit, and the user who made the change.
This allows, with relative ease, constructing tools that update sites, reboot systems, or trigger more complicated toolchains as required.
The Architecture
The typical arrangement comprises a server listening for incoming requests and a client that submits requests along with some parameters, possibly including some authentication and authorization.
The Server
First up, let’s discuss the server side. Typically, this will be a daemon listening for an HTTP request that matches certain conditions for it to be processed. If these conditions are not met, the request is rejected with the appropriate HTTP status codes, and for a successful submission, parameters can be extracted from the approved request and then custom actions are invoked as required.
The Client
As the server uses HTTP, almost any client can be used. cURL is a very popular choice, but we will use a slightly more pleasant one called gurl which has built-in support for HMAC signatures.
The Message
The message is typically a JSON object. For those who care about replay or timing attacks, you should include a timestamp in the body, and validate it before further processing. If your webhook toolkit can sign and validate specific headers, that’s an option also, but most don’t.
The Security
The body of the HTTP request can be signed with a shared secret key, and this resulting signature then provided as a message header. This provides both a means of authentication and also proof that the request has not been altered in transit. It relies on a shared key to enable both ends to verify the message signature independently using the additional HTTP header with the body of the message.
The most common signature method is HMAC-SHA256. This is a combination of two cryptographic algorithms — the familiar SHA256 hash algorithm that gives a secure digest of a larger message, in our case the HTTP body, and the HMAC method, which takes a secret key and mixes it with a message to produce a unique code, a digital signature, if you like.
These functions are combined to produce a high-integrity check if the message has been tampered with. It’s like a digital seal over the contents and confirms that the message must have been sent from a party that knows the shared secret.
Note that using both TLS encryption and a signature provides both confidentiality and integrity of the enclosed message, but not availability. A well-positioned attacker could interrupt or flood the intervening network and messages would be lost without notification.
Common practice is to include a timestamp in the body of the webhook, and as this is covered by the HMAC signature, timing and replay attacks can be mitigated.
Note that a non-timestamped body will always have the same signature. This can be useful. For example, this allows pre-calculation of the HMAC signature, and using an unchanging HTTP request to trigger remote actions, without needing to make the HMAC secret available on the system issuing the webhook request.
Putting it Together
We’ll install a few packages to help, a webhook server, the well-known tool curl, and finally gurl, a tool that makes signing webhooks easy.
$ sudo pkg install -r FreeBSD www/webhook ftp/curl www/gurl
Let’s get our server up and running, with this minimal example, save it as webhooks.yaml.
It will use the logger(1) command to write a short entry into /var/log/messages with the HTTP User-Agent header of the successful webhook.
Note that there is a trigger-rule key that ensures the HTTP query parameter, secret, matches the word squirrel.
Currently we have no TLS security and no HMAC signature either, so this is not a very secure system yet.
---
	- id: logger
  execute-command: /usr/bin/logger
  pass-arguments-to-command:
  - source: string
    name: '-t'
  - source: string
    name: 'webhook'
  - source: string
    name: 'invoked with HTTP User Agent:'
  - source: header
    name: 'user-agent'
  response-message: |
    webhook executed
  trigger-rule-mismatch-http-response-code: 400
&nbs;&nbs;trigger-rule:
    match:
      type: value
      value: squirrel
    &nbs; parameter:
       source: url
       name: secret
And run webhook -debug -hotreload -hooks webhook.yaml in a terminal. The flags used should be self-explanatory.
In another terminal, run tail -qF /var/log/messages | grep webhook so that we can see the results in real time.
Finally, let’s kick the webhook using curl, first without the query parameter, and then again, with it:
$ curl -4v ‘http://localhost:9000/hooks/logger’
* Trying 127.0.0.1:9000…
* Connected to localhost (127.0.0.1) port 9000
› GET /hooks/logger HTTP/1.1
› Host: localhost:9000
› User-Agent: curl/8.3.0
› Accept: */*
›
‹ HTTP/1.1 400 Bad Request
‹ Date: Fri, 20 Oct 2023 12:50:35 GMT|
‹ Content-Length: 30
‹ Content-Type: text/plain; charset=utf-8
‹
* Connection #0 to host localhost left intact
Hook rules were not satisfied.
Note how the failed request is rejected using the HTTP status specified in the webhooks.yaml config file and the returned HTTP body explains why.
Providing the required query and secret paramter:
$ curl -4v 'http://localhost:9000/hooks/logger?secret=squirrel'
*   Trying 127.0.0.1:9000...
* Connected to localhost (127.0.0.1) port 9000
› GET /hooks/logger?secret=squirrel HTTP/1.1
› Host: localhost:9000
› User-Agent: curl/8.3.0
› Accept: */*
›
‹ HTTP/1.1 200 OK
‹ Date: Fri, 20 Oct 2023 12:50:39 GMT
‹ Content-Length: 17
‹ Content-Type: text/plain; charset=utf-8
‹
webhook executed
* Connection #0 to host localhost left intact
The hook is executed and we can see the result in syslog output.
Oct 20 12:50:39 akai webhook[67758]: invoked with HTTP User Agent: curl/8.3.0
Using HMACs to Secure Webhooks
The HMAC signature described earlier, when applied over the HTTP body and sent as a signature, is tamper-proof, providing authentication and integrity, but only of the body, not of headers. Let’s implement that. Our first step is to generate a short secret and modify webhook.yaml to require verification.
$ export HMAC_SECRET=$(head /dev/random | sha256)
We’ll use a more memorable secret of n0decaf one for this article, but you should use a nice strong one.
Replace the webhook.yml file with this one, which will extract two JSON values from the payload (which is signed, and therefore trusted), and pass them to our command for execution.
---
- id: echo
  execute-command: /bin/echo
  include-command-output-in-response: true
  trigger-rule-mismatch-http-response-code: 400
  trigger-rule:
    and:
    # ensures payload is secure -- headers are not trusted
    - match:
        type: payload-hmac-sha256
        secret: n0decaf
        parameter:
          source: header
          name: x-hmac-sig
  pass-arguments-to-command:
  - source: ‘payload’
    name: ‘os’
	  - source: ‘payload’
    name: ‘town’
And use openssl dgst to calculate the signature over the body
$ echo -n ‘{“os”:”freebsd”,”town”:”vienna”}’ \
    | openssl dgst -sha256 -hmac n0decaf
SHA2-256(stdin)= f8cb13e906bcb2592a13f5d4b80d521a894e0f422a9e697bc68bc34554394032
With the body and the signature, now let’s make the first signed request:
$ curl -v http://localhost:9000/hooks/echo \
    --json {“os”:”freebsd”,”town”:”vienna”} \
    -Hx-hmac-sig:sha256=f8cb13e906bcb2592a13f5d4b80d521a894e0f422a9e697bc68bc34554394032

*  Trying [::1]:9000...
* Connected to localhost (::1) port 9000
› POST /hooks/echo HTTP/1.1
› Host: localhost:9000
› User-Agent: curl/8.3.0
› x-hmac-sig:sha256=f8cb13e906bcb2592a13f5d4b80d521a894e0f422a9e697bc68bc34554394032
› Content-Type: application/json
› Accept: application/json
› Content-Length: 32
›
‹ HTTP/1.1 200 OK
‹ Date: Sat, 21 Oct 2023 00:41:57 GMT
‹ Content-Length: 15
‹ Content-Type: text/plain; charset=utf-8
‹
	freebsd vienna
* Connection #0 to host localhost left intact
On the server side with -debug mode running
[webhook] 2023/10/21 00:41:57 [9d5040] incoming HTTP POST request from [::1]:11747
[webhook] 2023/10/21 00:41:57 [9d5040] echo got matched
[webhook] 2023/10/21 00:41:57 [9d5040] echo hook triggered successfully
[webhook] 2023/10/21 00:41:57 [9d5040] executing /bin/echo (/bin/echo) with arguments [“/bin/echo” “freebsd” “vienna”] and environment [] using  as cwd
[webhook] 2023/10/21 00:41:57 [9d5040] command output: freebsd vienna

[webhook] 2023/10/21 00:41:57 [9d5040] finished handling echo
‹ [9d5040] 0
‹ [9d5040]
‹ [9d5040] freebsd vienna
[webhook] 2023/10/21 00:41:57 [9d5040] 200 | 15 B | 1.277959ms | localhost:9000 | POST /hooks/echo
Separately calculating the signature each time is error-prone. gurl is a fork of an earlier project and adds automatic HMAC generation as well as some niceties around handling and processing JSON.
The signature type, and the signature header name are prepended to the secret and joined by :. This is exported as an environment variable so that its not directly visible in shell history.
$ export HMAC_SECRET=sha256:x-hmac-sig:n0decaf
$ gurl -json=true -hmac HMAC_SECRET \
  POST http://localhost:9000/hooks/echo \
  os=freebsd town=otutahi

POST /hooks/echo HTTP/1.1
Host: localhost:9000
Accept: application/json
Accept-Encoding: gzip, deflate
Content-Type: application/json
User-Agent: gurl/0.2.3
X-Hmac-Sig: sha256=f634363faff03deed8fbcef8b10952592d43c8abbb6b4a540ef16af0acaff172

{“os”:”freebsd”,”town”:”otutahi”}
As we can see above, the signature is generated for us, and adding JSON key=value pairs is straightforward without needing quoting and escaping.
Back comes the response, pretty-printed for us: the HMAC has been verified by the server, the values of the two keys extracted and passed as parameters to our echo command, and the results captured and returned in the HTTP response body.
HTTP/1.1 200 OK
Date : Sat, 21 Oct 2023 00:50:25 GMT
Content-Length : 16
Content-Type : text/plain; charset=utf-8

freebsd otutahi
More complex examples are provided in the port’s sample webhook.yaml or the extensive documentation.
Securing Webhook Contents
While using HMACs prevents tampering with the message body, it’s still visible in plain text to those dastardly hackers.
Let’s add some transport-layer security, using a self-signed TLS key and certificate, for the webhooks server on localhost and relaunch the webhook server:
$ openssl req -newkey rsa:2048 -keyout hooks.key \
  -x509 -days 365 -nodes -subj ‘/CN=localhost’ -out hooks.crt

	$ webhook -debug -hotreload \
	  -secure -cert hooks.crt -key hooks.key \
  -hooks webhook.yaml
The curl command will need an additional -k parameter to ignore our self-signed certificate, but otherwise things proceed as before:
curl -4vk https://localhost:9000/hooks/logger?secret=squirrel
'
*   Trying 127.0.0.1:9000...
* Connected to localhost (127.0.0.1) port 9000
* ALPN: curl offers h2,http/1.1
* TLSv1.3 (OUT), TLS handshake, Client hello (1):
* TLSv1.3 (IN), TLS handshake, Server hello (2):
* TLSv1.3 (OUT), TLS change cipher, Change cipher spec (1):
* TLSv1.3 (OUT), TLS handshake, Client hello (1):
* TLSv1.3 (IN), TLS handshake, Server hello (2):
* TLSv1.3 (IN), TLS handshake, Encrypted Extensions (8):
* TLSv1.3 (IN), TLS handshake, Certificate (11):
* TLSv1.3 (IN), TLS handshake, CERT verify (15):
* TLSv1.3 (IN), TLS handshake, Finished (20):
* TLSv1.3 (OUT), TLS handshake, Finished (20):
* SSL connection using TLSv1.3 / TLS_AES_128_GCM_SHA256
* ALPN: server accepted http/1.1
* Server certificate:
*  subject: CN=localhost
*  start date: Oct 20 13:05:09 2023 GMT
*  expire date: Oct 19 13:05:09 2024 GMT
*  issuer: CN=localhost
*  SSL certificate verify result: self-signed certificate (18), continuing anyway.
* using HTTP/1.1
› GET /hooks/logger?secret=squirrel HTTP/1.1
› Host: localhost:9000
› User-Agent: curl/8.3.0
› Accept: */*
›
* TLSv1.3 (IN), TLS handshake, Newsession Ticket (4):
› HTTP/1.1 200 OK
› Date: Fri, 20 Oct 2023 13:12:07 GMT
› Content-Length: 17
› Content-Type: text/plain; charset=utf-8
›
	webhook executed
* Connection #0 to host localhost left intact
gurl has no such option and expects you to do things properly. For production usage, it is much better to use a reverse proxy such as nginx or haproxy to provide robust TLS termination, and allows using public TLS certificates, via Let’s Encrypt and similar services.
Updating a Website with Github and Webhooks
For this to work successfully, you’ll need both to have your own domain, and a small server or virtual machine to host the daemon on. While this article can’t cover the full details for setting up your own website, TLS encryption certificates, and DNS, the steps below will largely be similar for any software forge.
You will need to setup a proxy server, such as Caddy, nginx, haproxy, or similar, with working TLS. A great choice is to use the ACME protocol, via Let’s Encrypt, to maintain this for you.
You’ll need to adjust your proxy server to route appropriate requests to the webhook daemon. Consider restricting IP addresses that can access it, and restricting HTTP methods, as well. Github’s API has a /meta endpoint to retrieve their IP addresses, but you’ll need to keep this up to date, however.
Enable the webhook service as follows, using the same options we used before, and start your daemon via sudo service webhook start
# /etc/rc.conf.d/webhook
webhook_enable=YES
webhook_facility=daemon
webhook_user=www
webhook_conf=/usr/local/etc/webhook/webhooks.yml
webhook_options=” \
  -verbose \
  -hotreload \
  -nopanic \
  -ip 127.0.0.1 \
  -http-methods POST \
  -port 1999 \
	  -logfile /var/log/webhooks.log \
  “
You’ll need to validate from outside, that the URL and webhook daemon are accessible.
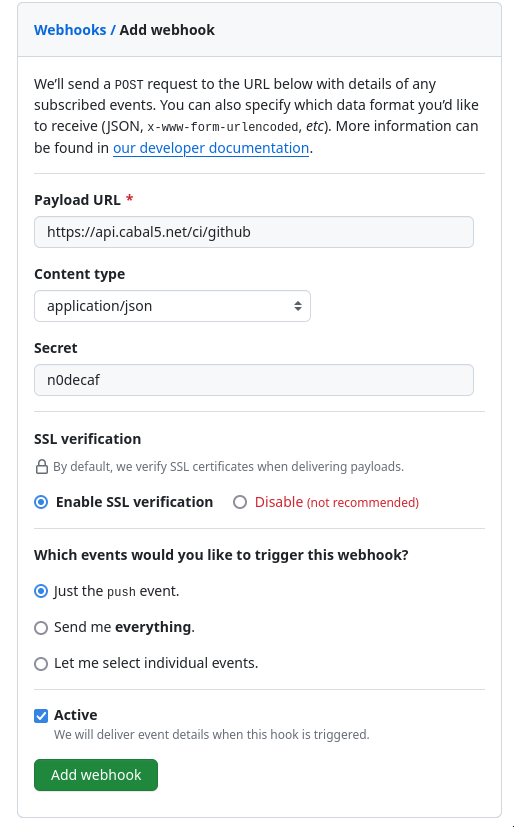
On your software forge side, create a new JSON format webhook, with the shared HMAC secret, to be invoked on every push to your repository.
For example, using Github you must provide a:
- payload URL, pointing to the external URL for your proxied internal webhook daemon
- content-type application/json
- the shared secret, such as n0decaf in the examples
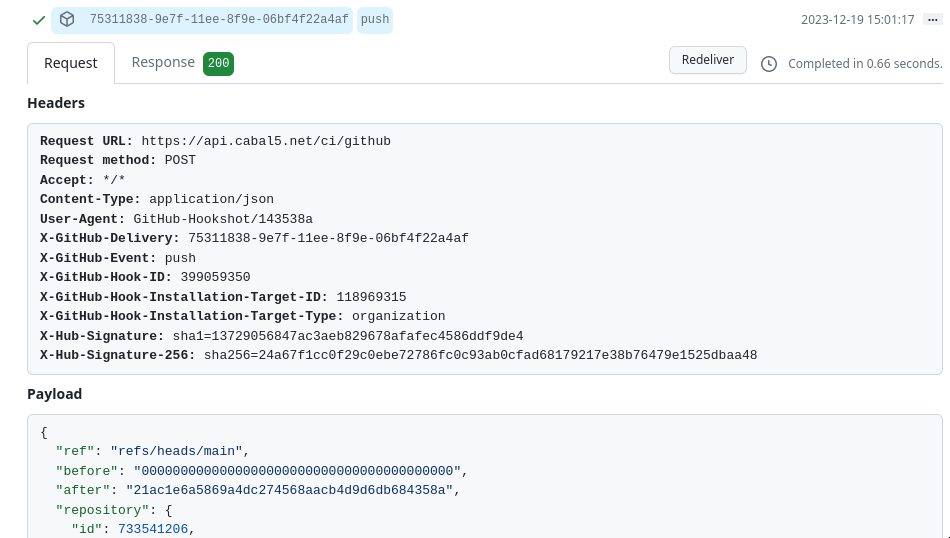
Once the webhook has been created on the GitHub side, you should be able to confirm that a successful event was received, and then on your next push of code, you can check on the Github website for the request that GitHub sent, and the response your daemon provided
—FreeBSD Journal, November/December 2023