Netgraph for the Rest of Us
Making FreeBSD’s powerful networking framework accessible to everyone who runs jail and VM guests
A few years ago, I wrote about leveraging FreeBSD in datacenters as a performant and cost-effective alternative to cloud options using tools in the FreeBSD base. As my infrastructure continued to grow, I explored ways to improve performance and management, and getting my network stack just right was one of my key goals. This led me to trying out Netgraph, and I liked it so much that I created an rc service-based tool to simplify its configuration for basic setups, ngbuddy(8).
Netgraph, introduced to FreeBSD in 1999, is a networking toolkit that can be used for complex and powerful configurations and specialized networking workflows in a node and link structure. Think of it as a modular building system: nodes (the networking building blocks) connected by hooks (links between nodes or other network objects) to create multiple layers of switches, traffic shapers, or custom virtual networks. Most commonly it’s used to hook VM and jail guests to a host’s physical or virtual network, but Netgraph can layer these objects in interesting and complex ways. For instance, a FreeBSD pro I met at BSDCan uses a clever Netgraph setup to “mirror” traffic redundantly over multiple physical circuits in a RAID-like fashion, greatly improving stability and resilience for critical VoIP operations.
I’ll introduce the core concepts of Netgraph, explore tools like ngbuddy and jng that simplify its configuration, walk through manual setup for those who want to understand the underlying mechanics, and provide resources for further exploration. Whether you’re new to FreeBSD networking or a know-it-all admin looking to delve deeper, you’ll find practical approaches to leverage this powerful framework by giving Netgraph a try.
Why Netgraph Rocks (and Where It Doesn’t)
The traditional approach to networking with VMs and jails in FreeBSD typically involves
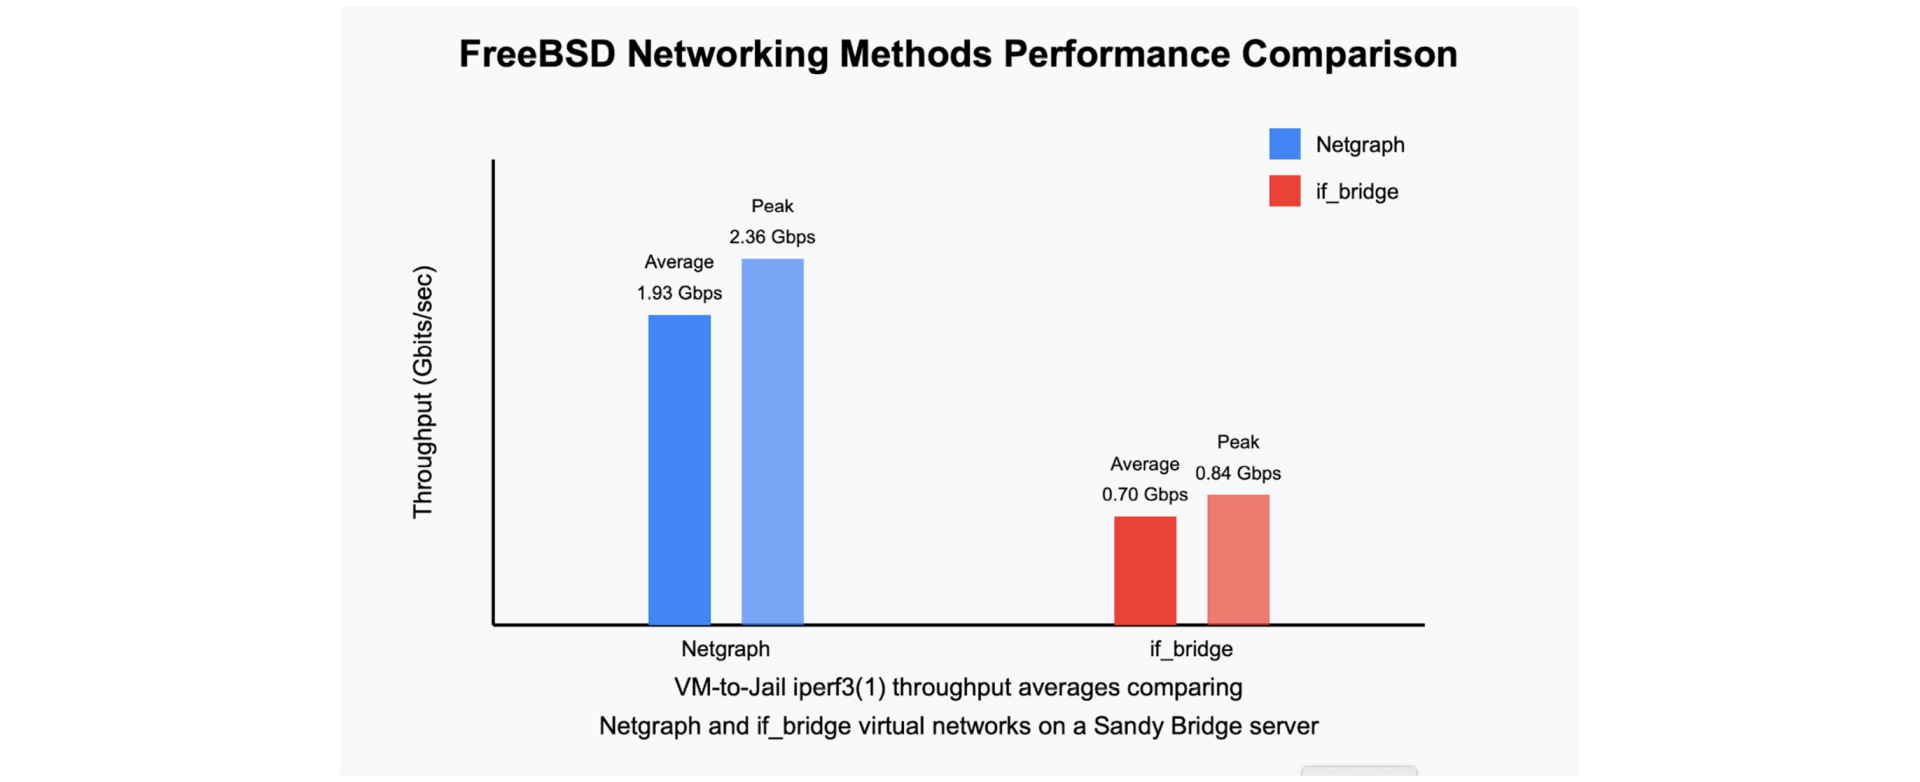
if_bridge(4), tap(4), and epair(4) interfaces. This standard choice is great and getting even better; there was a massive if_bridge speed improvement in 2020. But less than a year later, FreeBSD 13 introduced Netgraph support in bhyve, providing its users with this great alternative. There are good reasons to try Netgraph, but I probably wouldn’t have used it if if_bridge reliably outperformed it. I ran several simple iperf3 performance tests between a FreeBSD 14.3 jail and FreeBSD 14.3 bhyve VM, comparing both if_bridge/tap/epair and pure Netgraph communication, on several of my servers of varying age. Though my results are far from scientific, Netgraph was consistently faster regardless of hardware configuration.
Outside of the ideal conditions above, Netgraph has performance scaling limitations at high packet rates due to a bottleneck in its hook lookup mechanism. There is a promising fix in development that will hopefully make it into FreeBSD 15, but until then, this locking issue makes Netgraph the wrong choice for heavy packet-slinging applications like CDN frontends. However, for the virtualization density we’re discussing — a few dozen mixed-use bhyve VMs or jails per host — Netgraph provides consistently reliable performance. In my production environments with similar configurations, I’ve observed excellent throughput and stability over multiple years of operation.
Netgraph offers other advantages beyond performance:
- Cleaner configuration: Fewer visible ifconfig devices and focused commands provide a calmer environment
- Metrics: Easy access to traffic statistics for monitoring and troubleshooting
- Flexibility: By using Netgraph as your networking suite, the door is opened to its full set of features
- Visualization: The graph structure makes it easy to understand your hosts’ network topologies, and there are built-in tools to help visualize them
The main drawback of Netgraph is that it can be a bit daunting at first. Netgraph has over 40 FreeBSD manpages for all of its concepts, tools, and kernel modules, so it can be tough to figure out where to get started. However, there are really just a few things to know for most of our setups.
Learn Netgraph Basics: Nodes and Hooks
First, let’s get in the mindset of nodes and hooks.
- Nodes: These are the processing modules that perform specific networking functions
- Hooks: Connection points on nodes that allow data to flow between them
To do basic networking with bhyve and jails, you should know about these node types:
- ng_bridge: A virtual switch that connects nodes together for communication
- ng_ether: A Netgraph representation of an existing Ethernet interface, e.g., for bridging virtual devices to a physical network
- ng_eiface: A virtual Ethernet interface created by Netgraph, also suitable for a jail’s interface
- ng_socket: A connection for a user process (like bhyve) to interact with Netgraph
The power of Netgraph comes from how these components can be connected. For example, you can create a virtual switch (ng_bridge) that connects both physical interfaces (ng_ether) and virtual interfaces (ng_eiface) used by jails or VMs. You can even layer bridges deeply, which is an elegant way to model complex network topologies on a single FreeBSD system.
Simplify Netgraph with ngbuddy
While Netgraph is powerful, the syntax for creating and managing nodes can be a little tricky. Its precision means that you must be explicit about some things that are done automatically when working with ifconfig(8) alone. I wrote ngbuddy (Netgraph Buddy) to automate this for mixed VM and jail environments and keep our changes persistent on boot.
In the following example, we’ll start from a clean FreeBSD 14 install to create and use a “public” Ethernet-connected bridge and “private” host-only bridge, similar to the networking defaults in popular hypervisor managers. We’ll also use vm-bhyve, which added Netgraph support in July 2022, to further simplify VM management.
Set Up a Basic Virtual Network
We’ll mimic the traditional approach to setting up a virtual network for jails or VMs using if_bridge, tap, and epair interfaces. With Netgraph and ngbuddy, we’ll configure ng_bridge nodes instead, linking the “public” bridge to the host’s interface that is associated with the default route.
First, install ngbuddy from ports:
# pkg install sysutils/ngbuddy
Then, enable the service to create a basic configuration:
# service ngbuddy enable
Adding default bridges.
ngbuddy_public_if: -> ix0
ngbuddy_private_if: -> nghost0
This creates two bridges:
- public: Connected to your physical interface (ix0 in this example)
- private: Connected to a new virtual interface (nghost0) for host-only networking.
If you’d like different bridge names (I prefer more specific names, like “lanbridge”), edit the ngbuddy lines in /etc/rc.conf to your liking.
Start the service to create the Netgraph bridge nodes:
# service ngbuddy start
Created 3 links.
At this point, the “public” switch is ready to go and should work like any device connected to your host’s network. For the “private” host-only network, you most likely need to configure additional networking components. This usually includes setting up NAT rulesets and a DHCP server on the nghost0 interface. You can configure nghost0 like any standard interface using ifconfig commands or by adding appropriate entries to /etc/rc.conf.
Configure vm-bhyve
If you’re using vm-bhyve 1.5.0 or newer, you can leverage ngbuddy to configure your virtual switches (be careful not to conflict with any existing vm-bhyve bridge names):
# service ngbuddy vmconf
This adds the following to your vm-bhyve configuration file, your defined $VM_DIR/.config/system.conf:
switch_list=”public private”
type_public=”netgraph”
type_private=”netgraph”
With this configuration in place, vm-bhyve is ready to go. When configuring your VMs, just include the proper switch name in each VM configuration, for example:
network0_switch=”public”
Create Interfaces for Jails
Add or replace the following lines in your jail’s configuration to automatically create an ng_eiface device when the jail starts:
my_jail_name {
   if_name = “$name”;
   $bridge = “public”;
   vnet.interface = “$if_name”;
   exec.prestart = “service ngbuddy jail $if_name $bridge”;
   exec.prestop = “service ngbuddy unjail $if_name $name”;
…
This example uses the jail name variable $name as the interface name to keep things unique and consistent. You can choose any interface naming scheme that works for your environment, as long as each interface has a unique name.
Monitor Traffic
Monitoring traffic through your Netgraph nodes is simple with ngbuddy, which provides a simplified view of the ngctl … getstats command for all interfaces it detects:
# service ngbuddy status
public
  vtnet0 (upper): RX 1.25 MB, TX 4.37 MB
  vtnet0 (lower): RX 4.37 MB, TX 1.25 MB
  jail1: RX 256.32 KB, TX 128.16 KB
private
  nghost0: RX 0B, TX 0B
  jail2: RX 0B, TX 0B
This provides a quick overview of traffic flowing through each interface, which can be invaluable for troubleshooting and performance monitoring. You can also use service ngbuddy status or service ngbuddy vmname to identify vm-bhyve nodes, which would otherwise appear as “unnamed” ng_socket devices in ngctl output.
Visualize Your Network
We can easily make a picture of the host’s virtual network using the ngctl dot command which produces directed graph text output that looks like this:
graph netgraph {
    edge [ weight = 1.0 ];
    node [ shape = record, fontsize = 12 ] {
       “45” [ label = “{nghost0:|{eiface|[45]:}}” ];
       “49” [ label = “{private:|{bridge|[49]:}}” ];
       “4e” [ label = “{public:|{bridge|[4e]:}}” ];
       “52” [ label = “{jpub1:|{eiface|[52]:}}” ];
       “12” [ label = “{bge0:|{ether|[12]:}}” ];
       “13” [ label = “{bge0_42:|{ether|[13]:}}” ];
       “7b” [ label = “{vmpriv:|{socket|[7b]:}}” ];
    };
    subgraph cluster_disconnected {
       bgcolor = pink;
       “12”;
    };
    node [ shape = octagon, fontsize = 10 ] {
       “45.ether” [ label = “ether” ];
    };
…
This text can be converted directly into a visual SVG or PNG graph using the dot(1) command from the graphics/graphviz port. Here’s a cleaned-up output example of a simple Netgraph setup.
Though this output is great, ngbuddy includes a helper script called ngbuddy-mmd.awk which I wrote to turn this output into colorful and cleaner mermaid-js visualizations. My company’s documentation system supports mermaid-js, so with a bit of API magic I always have up-to-date Netgraph diagrams of all hosts in my fleet in my documentation database.

This diagram includes the hostname at the top, shapes for public and private bridges in the middle, and jails (ovals) and VMs (cylinders) at the bottom. These visualizations are particularly useful when you’re running servers with various tenant networks and different functions.
Manage MAC Address Collisions
Regardless of which virtual networking technology I use, I’ve had terrible luck with MAC collisions. Even in my home lab with 5 or fewer FreeBSD hosts per network segment, I’ve had afternoons of scratching my head until discovering that some jails were fighting for the same MAC address. To help mitigate this issue and to ensure deterministic MAC address creation, which is very important for guest migrations, you can run the following on all of your ngbuddy hosts.
sysrc ngbuddy_set_mac=YES
sysrc ngbuddy_set_mac_prefix=02
This configuration ensures that ngbuddy will assign unique MAC addresses to interfaces it creates, using your specified prefix. The “02” prefix indicates a locally administered address, which is appropriate for virtual interfaces in an environment you control.
See the ngbuddy manpage for additional tips and features.
Use jng: No Ports Required
The jng tool remains the simplest way to get started using Netgraph with jails, and it comes built into FreeBSD. The script intelligently creates bridges when needed, which is perfect for many jail host setups. To get started, copy jng into your preferred directory:
install -m 755 /usr/share/examples/jails/jng /usr/local/sbin/jng
In your jail’s configuration, we can invoke jng like the ngbuddy example. Note that jng needs the name of the physical interface you’d like to bridge.
my_jail_name {
        $if_uplink=”em0”;
        $if_name = “ng0_$name”;
        vnet.interface = “$if_name”;
        exec.prestart += “jng bridge $if_name $if_uplink”;
        exec.poststop += “jng shutdown $if_name”;
…
If you’re interested in writing your own networking workflow, be sure to read the beautifully documented jng script.
Implement Netgraph the Old-Fashioned Way
Now it’s time to explore why Netgraph configuration can be annoying and see what the above tools are doing under the hood. FreeBSD virtual networking is mostly done with ifconfig, and those objects are revealed there. With Netgraph, some of these objects are only visible with ngctl and other Netgraph-aware tools, which can be a bit confusing. Also, unlike working with ifconfig, since Netgraph hooks can have complex relationships with each other, we’ll have to keep track of our hooks. Let’s get started by manually creating the “private” and “public” ng_bridge examples we discussed before plus a host-only Netgraph ng_eiface device to communicate between the host and the virtual “private” bridge. In our example, we’ll use “em0” as our real interface that we’d like to bridge.
# Load the Netgraph kernel modules
kldload ng_ether ng_bridge

# Create an ng_bridge and call it “private”
ngctl mkpeer ngeth0: bridge ether link0
ngctl name ngeth0:ether private

# Share traffic on em0 with linked Netgraph nodes
ngctl msg em0: setpromisc 1

# Create an ng_bridge device and name it “public”
ngctl mkpeer em0: bridge lower link1
ngctl name em0:lower public
ngctl connect em0: public: upper link2

# Turn off performance features that virtual switches hate
ifconfig em0 -lro -tso

# Create an virtual ethernet device ngeth0 (this will appear in ifconfig)
ngctl mkpeer eiface ether ether
The gist here is that we must set up each object, wire it with a unique link#, and then name it if we want any hope of keeping track of it. Let’s make another ng_eiface device for a jail.
# Create a new interface, then print its name
ngctl mkpeer public: eiface link3 ether
ngctl show -n public:link3 | cut -w -f3
Our new interface in this example will be ngeth1. We can configure it with ifconfig as normal. If our new interface becomes a VNET jail, it will still be able to communicate with our network via its Netgraph link with its bridge.
Though it probably doesn’t take more keystrokes than standard FreeBSD virtual networking, Netgraph is definitely less suited for manual tinkering due to its more complex syntax and the need to track link numbers.
Continue Your Netgraph Journey
Netgraph represents one of FreeBSD’s hidden gems—a powerful networking framework that, once understood, offers elegant solutions to complex networking challenges. While it may seem intimidating at first, tools like ngbuddy and jng make it accessible to administrators of all skill levels.
Whether you’re managing a small home lab or a complex production environment, Netgraph provides the flexibility and power to create exactly the network topology you need. The performance benefits, cleaner configuration, and visualization capabilities make it worth considering for your virtualization infrastructure. I encourage you to explore this powerful subsystem and discover how it can simplify your virtual networking setup.
Resources
- Netgraph man page (man 4 netgraph)
- ngbuddy on GitHub (includes full jail.conf examples)
- FreeBSD Handbook: Jails and Containers
- FreeBSD Handbook: Virtualization
- Call For Testing: Jail & bhyve Users’ Calls