Implementing a Quantum-Safe Website
Some time ago, at my current workplace, it was brought to my attention that traditional cryptography will no longer be considered secure.
According to various sources, it is estimated that in the next 10 years, the advancements in quantum computing will reach a point where modern-day cryptographic algorithms that we take for granted will be easily broken within seconds. Naturally, I started researching this topic to find out how bad the situation is and what we can do today to prepare our systems for this scenario. This so-called “Quantum Threat” is generally described as the point in the future where quantum computers will possess enough processing power to break traditional encryption in a matter of minutes or even seconds. Sounds bad, right? Well, it gets even worse. There is a related phenomenon called “Store now – decrypt later” or “Harvest now – decrypt later,” which basically means that currently secure data transmissions sent over the internet are captured and stored until a sufficiently powerful quantum computer is widely available for anyone to utilize it to decrypt the previously captured data.
But what is “currently secure”? In terms of asymmetric encryption, there are key exchanges, the most used method of which is RSA using 2048, 3072, or 4096 bits of key length. These key exchanges (not limited to only RSA) can be a part of an SSH session to a remote server, using a TLS-encrypted website to enter your bank account details, or even an IKEv2-based IPSec VPN tunnel between two remote locations. All the data sent over these channels can be intercepted and stored now and decrypted later. But how does one go about decrypting RSA keys? The answer to that question is Shor’s algorithm, which was invented by Peter Shor in the 1990s. It was designed to find the factors of a prime number using a quantum computer. But what does this have to do with key exchange algorithms? Let’s take RSA, for example. In simple terms, it works by multiplying two big prime numbers to create an even bigger number. The two primes are kept secret and are part of the private key alongside some other numbers. The product of those two primes is part of the public key with some extra numbers. What makes this vulnerable is the fact that if you manage to find out the two starting prime numbers, you can use them to compute part of the private key, which can be used to find the remainder of it. If you have the private key, you can decrypt what one side sent. Do it again for the other, and you have yourself a fully decrypted captured information exchange. Of course, it takes a tremendous amount of computing power because the bigger the public key is, the more number-crunching you must do. Shor’s algorithm provides a method to speed up the process using a quantum computer, which can calculate all the possible solutions at once.
But how can we defend our systems against this kind of attack? There are three answers:
You can keep using the standard algorithms, but with longer keys. Currently, it is believed that RSA keys over 4096 bits of key length are considered long enough that they cannot be cracked soon. If you want to play it safe, use key lengths of 8192 bits or longer.
However, there are other alternative methods to tackle this problem. The second one is PQC (Post-Quantum Cryptography). Researchers and mathematicians started working on other algorithms that would be resistant to Shor’s. These were based on so-called mathematical “trapdoor” functions: easy to get from an equation to a result, but (almost) impossible to do in reverse. The United States’ National Institute of Standards and Technology (NIST) began collecting these algorithms, and numerous cryptography experts and mathematicians started testing them to find out whether they are resistant to Shor’s algorithm or not. This was known as the Post-Quantum Cryptography project. Over the years, there were several rounds where various algorithms were eliminated. In 2024, NIST issued the FIPS 203 standard naming ML-KEM (previously known as CRYSTALS-Kyber or Kyber) as the primary standard for general encryption, and in 2025 stated that HQC will be a backup in case ML-KEM is ever compromised.
The third option is called QKD, which stands for Quantum Key Distribution and is based on the manipulation of photon particles using quantum physics to securely generate keys. This method is extremely costly as it requires specialized equipment and a pre-existing optical network connection between the two participating sides and has a current limit of around 100km between the endpoints.
The project’s goal
I have a website that I made some time ago using only nginx without any kind of HTML, CSS, PHP, or whatever. It’s a simple website that returns the IP address of the client (like icanhazip.com or ifconfig.me). It started out as a hobby project while I was learning about nginx, but I started to deploy it in larger networks to test if the client was behind NAT or not. This was a good starting point for my PQC experiment. The requirements were simple: it must work with a wide range of software (web browsers, command-line tools like fetch(1) or curl(1)), and having experienced the UNIX philosophy during my years of working with FreeBSD and Linux I wanted to keep it as simple as possible but stable as well since it could also run on a cloud VPS at some point in the future. So naturally, I chose FreeBSD as the OS and nginx as the platform. The only remaining part was the actual PQC implementation.
I did a little research and found a project called oqs-provider by the Open Quantum Safe project, which is an open-source C library and provider for OpenSSL version 3, implementing ML-KEM among other algorithms. It is available for FreeBSD and for various Linux distributions as well.
How it works
Simply put, it integrates various PQC algorithms for key exchange and signature with OpenSSL. In terms of key exchanges (alongside others), it supports ML-KEM with several elliptic curve-based Diffie-Hellman key exchanges like X25519, p384, p521, and SecP384r1. These can be easily identified based on their names, like X25519MLKEM768, which uses Curve 25519 with 768-bit long ML-KEM keys. PQC algorithms require TLSv1.3, but for compatibility reasons, we will define TLSv1.2 as the minimum version, so legacy systems will still be able to reach the website. One thing to keep in mind is the “TL;DR fail” error, which can happen if the client software is not properly set up to support PQC algorithms over TLSv1.3, resulting in a TLS failure, but this will gradually be a smaller nuisance over time as software gets updated and rolled out to clients. If you are not concerned with legacy clients or buggy software and want a 100% quantum-safe website, feel free to disable TLSv1.2 altogether (as you’ll see in the nginx configuration file later). With the theory part out of the way, let’s get to the fun stuff: the actual implementation!
Implementation
The oqsprovider requires OpenSSL version 3.2 or higher. According to their GitHub page, they have added some extra functionality starting with version 3.4. My FreeBSD installation has OpenSSL version 3.0.16, which doesn’t support oqsprovider.
At the time of this writing, OpenSSL 3.5.0 was released with native PQC algorithm support, but a note from pkg(8) indicated that it was in beta stage, not suitable for production. So, for the rest of the implementation, I will stick with OpenSSL version 3.4.1.
To start things off, I updated my VM to FreeBSD 14.3-RELEASE. We will have to install a newer version of OpenSSL as well as nginx, but with the ability to use the newer OpenSSL. To do this as hassle-free as possible, we will install openssl34 and openssl-oqsprovider via pkg(8), and nginx will be built using the ports system. For this reason, we will need to have the ports tree present under /usr/ports. I don’t have security/openssl34 present on my system, so I will be pulling the 2025Q2 branch of the ports tree. I will need that so nginx can be linked against openssl34. First, I will install git(1), which is the recommended method to install/update the ports tree as stated by the FreeBSD handbook.
# pkg install -y git
Once git(1) is on the system, it can manage the ports tree. However, I installed the ports tree with the base system some time ago, so I will be removing the current /usr/ports directory, so when I clone the repository, it will not complain about /usr/ports being already present. There are other ways around this, but I like to start things off clean.
# rm -rf /usr/ports
# git clone --depth 1 https://git.FreeBSD.org/ports.git -b 2025Q2 /usr/ports
Afterwards, we need to install OpenSSL 3.4.1 and oqsprovider.
# pkg install -y openssl34 openssl-oqsprovider
Then, as the installation message suggests, we will need to merge the contents of /usr/local/openssl/oqsprovider.cnf with /usr/local/openssl/openssl.cnf. Since we just installed the new version of OpenSSL, after the merge, the contents of /usr/local/openssl/openssl.cnf will look like this:
…
[provider_sect]
default = default_sect
oqsprovider = oqsprovider_sect
….
[default_sect]
activate = 1

[oqsprovider_sect]
activate = 1
module = /usr/local/lib/ossl-modules/oqsprovider.so
…
Now we will compile nginx.
# cd /usr/ports/www/nginx
I will export some environmental variables to make nginx link against the newly installed OpenSSL 3.4.1
# export OPENSSL_BASE=/usr/local
# export OPENSSL_LIBS=”-L/usr/local/lib”
# export OPENSSL_CFLAGS=”-I/usr/local/include”
Then we will configure nginx to make sure that “HTTP_SSL” is supported (it should be enabled by default, but it’s always better to double-check). I will not adjust any other settings.
# make config
Now we are ready to start compiling nginx. Set some environmental variables to indicate the path of the newly installed OpenSSL and hit enter.
# make OPENSSLBASE=/usr/local OPENSSLDIR=/usr/local/openssl install clean
While nginx is compiling, go and grab your favorite beverage, work on some tickets, or show the compilation output to your friends so they can see how cool you are.
After the compilation is done, let’s verify that nginx now links against OpenSSL 3.4.1 that we installed under /usr/local:
# nginx -V 2>&1 | grep -i openssl
built with OpenSSL 3.4.1 11 Feb 2025
# ldd /usr/local/sbin/nginx | grep ssl
    libssl.so.16 => /usr/local/lib/libssl.so.16 (0x16a83b849000)
Note: the hex identifier in parentheses may differ.
If your output is the same as mine, you have successfully added OpenSSL 3.4 support for nginx. Next, we will create a configuration file for our website to include PQC. Let’s head to /usr/local/etc/nginx, where we will first make a backup of the original nginx.conf file:
# cd /usr/local/etc/nginx
# mv nginx.conf nginx.conf.orig
And now let’s create a new configuration:
# vi nginx.conf
Add the following lines to the file:
events{}
http{
     server{
         listen 443 ssl;
         ssl_certificate /usr/local/etc/nginx/server.crt;
         ssl_certificate_key /usr/local/etc/nginx/private.key;
         ssl_protocols TLSv1.2 TLSv1.3; #remove TLSv1.2 if you don’t need backwards
compatibility
         ssl_prefer_server_ciphers off;
         ssl_ciphers ECDHE-ECDSA-AES128-GCM-SHA256:ECDHE-RSA-AES128-GCM-SHA256:ECDHE-ECDSA-AES256-GCM-SHA384:ECDHE-RSA-AES256-GCM-SHA384:ECDHE-ECDSA-CHACHA20-POLY1305:ECDHE-RSA-CHACHA20-POLY1305:DHE-RSA-AES128-GCM-SHA256:DHE-RSA-AES256-GCM-SHA384:DHE-RSA-CHACHA20-POLY1305; #if using pure TLSv1.3 you can remove this line according to Mozilla’s SSL Configuration Generator’s “modern” settings
         ssl_ecdh_curve X25519MLKEM768:X25519:prime256v1:secp384r1; #this is the PQC part, the others are for non-pqc compatibility only.
         location /{
            return 200 “$remote_addr\n”;
         }
     }
     server{
         listen 80;
         location /{
            return 301 https://$host$request_uri;
         }
     }
}
This configuration will do the following:
- listen on ports 80 and 443
- redirect plaintext HTTP requests to HTTPS
- utilize TLS1.3 and TLS1.2 for compatibility
- use balanced ciphers for the widest compatibility while still providing decent security. I got the cipher and curve list from the Mozilla SSL Configuration Generator.
Next, for this demo, I will create a self-signed certificate, but for production use (and for compatibility reasons), you should acquire a valid certificate that is signed by a trusted CA. You can use Let’s Encrypt certificates and automate the certificate renewal with certbot(1). For that, you can simply run:
# pkg install -y py311-certbot
After that, follow the walkthrough found at Certbot’s instructions.
To create the self-signed certificates, you can use this one-liner (remember to change the DNS and IP fields to match your setup):
# openssl req -x509 -nodes -days 365 -newkey rsa:2048 \
  -keyout private.key -out server.crt \
  -subj “/CN=quantum” \
  -addext “subjectAltName=DNS:quantum,IP:192.168.2.40”
It will use a 2048-bit long RSA key, but you might want to bump this all the way to 8192 (remember keys over 4K are considered quantum-safe for now), but keep in mind that could break compatibility with some older systems, and will be valid for 1 year, which is more than enough for this testing purpose. (Here, the phrase ”Nothing is more permanent than a temporary workaround” comes to my mind). It also includes the IP address and the hostname of my FreeBSD VM. If this were not the case, some software (like PowerShell) would complain that it cannot trust the certificate and would not be able to initiate/complete the TLS session with the website.
Once the certificate and its private key are both ready, you can start nginx, but first, we need to tell /etc/rc.conf that we would like to start it at boot time.
# sysrc nginx_enable=YES
# service nginx start
It will verify the syntax of the nginx.conf and test our configuration briefly before starting it. If everything is fine, you should see this:
Performing sanity check on nginx configuration:
nginx: the configuration file /usr/local/etc/nginx/nginx.conf syntax is ok
nginx: configuration file /usr/local/etc/nginx/nginx.conf test is successful
Starting nginx.
Testing
Now that we have a website up and running, let’s check if it works. For the tests, I will use several methods: a web browser and various command-line clients, like curl(1). I have curl installed already, but if that is not the case for you, install it with pkg:
# pkg install -y curl
You can check the website with curl (keep in mind the self-signed certificate — hence we’ll use the –insecure flag).
# curl --insecure https://127.0.0.1
It will return 127.0.0.1 and a newline character. To get a bit more info, you can throw in a -v flag to make the output verbose.
# curl --insecure -v https://127.0.0.1
In my case, since curl links against the default OpenSSL version, it doesn’t support PQC algorithms, so it falls back to X25519:
…
* SSL connection using TLSv1.3 / TLS_AES_256_GCM_SHA384 / X25519 / RSASSA-PSS
…
You can also verify the redirect with this command:
# curl --insecure -vL http://127.0.0.1
If you see this, it worked:
…
* Request completely sent off
< HTTP/1.1 301 Moved Permanently
….
* Clear auth, redirects to port from 80 to 443
…
For Microsoft Windows-based hosts, if you are using a self-signed certificate, you’ll need to import that (in our case, it’s server.crt) to the “Trusted Root Certification Authorities” store and run the following PowerShell command:
(Invoke-WebRequest https://192.168.2.40).Content
Or if you want a bit more verbosity:
Invoke-WebRequest https://192.168.2.40
Using curl also works, but it’s just a frontend to the Invoke-WebRequest and doesn’t have the same flags as the FreeBSD or Linux versions.
To test compatibility with other hardware, I have logged on to my MikroTik router and called the URL from the command line:
/tool fetch url=”https://192.168.2.40” output=user check-certificate=no
    status: finished
  downloaded: 0KiB
     total: 0KiB
    duration: 1s
     data: 192.168.2.1n
Note the “n” at the end. If you want to get rid of it, change the following line in /usr/local/etc/nginx/nginx.conf:
return 200 “$remote_addr\n”;
to this:
return 200 “$remote_addr”;
This will not return a newline character if called from a tool like curl. Decide which version you want. If you plan to use this IP address in scripts, get rid of the “\n”. For me, it is currently just for debugging, so I’ll leave it as-is.
In the case of web browsers, you might need to enable some features in certain versions if you wish to have PQC support. I am testing on Firefox version 139.0.4, which has PQC support enabled since version 132. In the case of Chrome, it has PQC support since version 124, but in some cases, you’ll need to enable it by hand:
chrome://flags/#enable-tls13-kyber
You can check if Firefox supports it by going to about:config and looking for this:
security.tls.enable_kyber
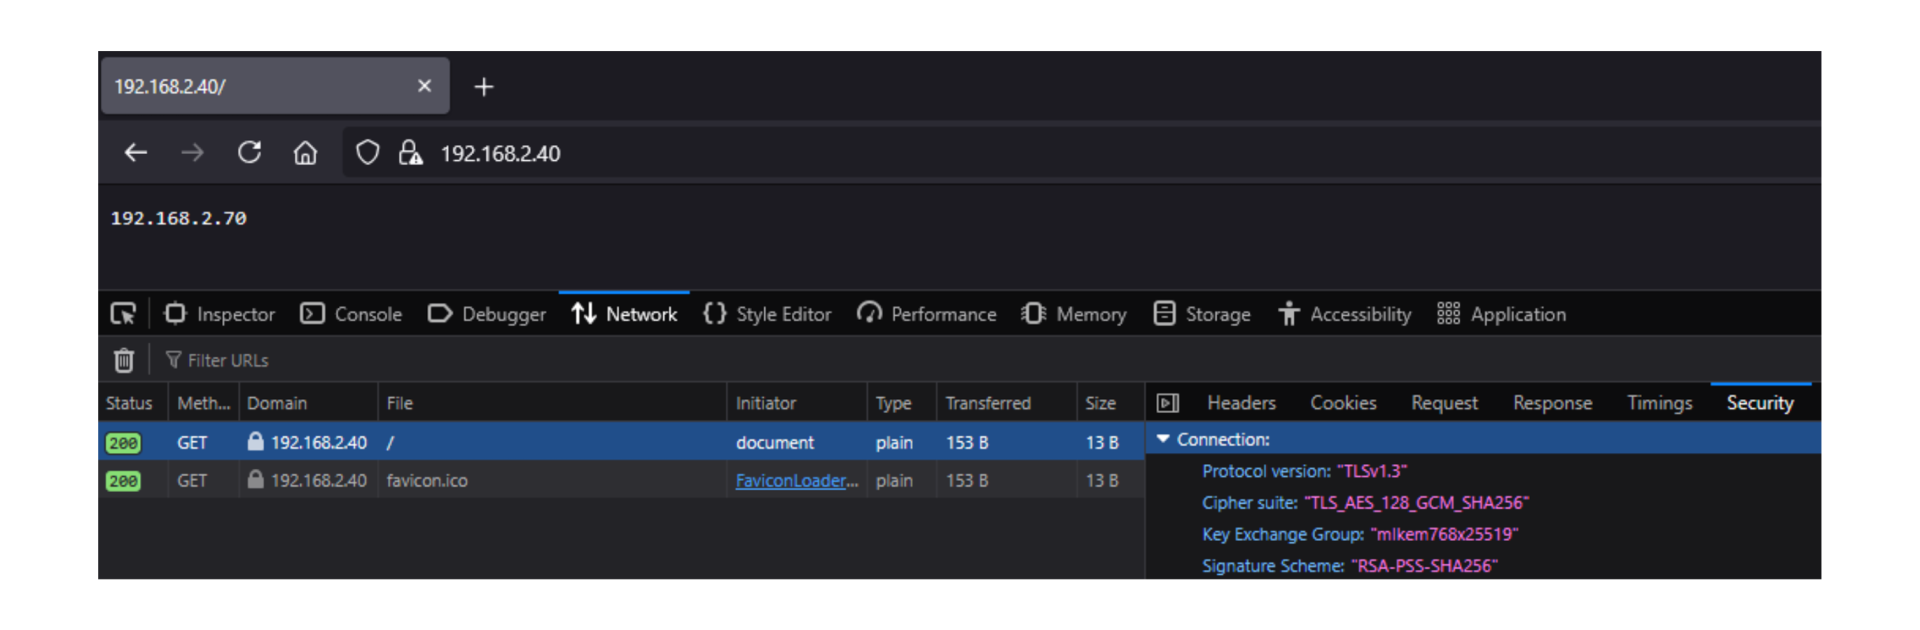
Next, open the developer tools by pressing F12 and navigate to ”network” if using Firefox or ”Privacy and security” in case of Chrome. Then input the IP address of your FreeBSD installation and press enter. You should see only an IP address on screen (that’s where the request originated from). In the developer tools, click on the entry that has your FreeBSD’s IP address, and if using Firefox, also click on the ”Security” tab on the right side.
If your browser supports PQC, you should see that the key exchange uses either mlkem768x25519 on Firefox or X25519MLKEM768 on Chrome.
If that’s the case, then congratulations! You have successfully deployed a PQC-secured website with legacy support on FreeBSD. Welcome to the future!
Conclusion
While it is not so difficult to add PQC support for a TLS key exchange, the overall process does include several extra — but needed — steps. One key concern is that you must compile nginx from source to use the newer OpenSSL version. This means that every time a security patch comes out, you will have to recompile it, which takes more time than simply applying the hotfix with either freebsd-update(8) or pkg(8). However, OpenSSL 3.5.0, which adds native support for various PQC algorithms, was recently released, and being a long-term stable (LTS) release, it will be supported until 2030 according to their website. With the ever-present quantum threat and the sudden rush to implement PQC as soon as possible, I would welcome it if this version were integrated into the FreeBSD base. That would eliminate most of the steps to get PQC working with nginx (and possibly other software). I also know, however, that stability is a major concern for FreeBSD, and until OpenSSL 3.5 has been thoroughly tested and vetted for bugs, we will probably find an older version of OpenSSL in the base install. This website was only a small example of quantum-safe encryption, but it is not hard to imagine additional software benefiting from PQC. Let’s say banking, healthcare, or governmental sites started rolling out ML-KEM. It would be almost impossible to decrypt communications between the servers and the clients, so bank account details, patient information, and personally identifiable information would be safe in transit against future quantum computers. It is not going to happen anytime soon, but as more people encounter the term “quantum-threat”, the more awareness is raised and the closer we all get to a world where post-quantum cryptography is part of our everyday lives.