
FreeBSD, Home Assistant, and rtl_433
A long time ago, I started playing with Home Assistant, and I’m very proud of a few automations. There is a motion sensor in the bathroom that turns on the light. If the sun has already set, the light turns on with a very dim orange light; otherwise, it uses the maximum power and white color. There is an automation that turns on the dehumidifiers if the relative air humidity exceeds a predefined value. Additionally, there is a safety measure. Unfortunately, we have a cellar window that is prone to flooding if the rain comes from the south, which is a rare occurrence. I have installed an external and an internal moisture sensor; when triggered, we get a message on Telegram and can act accordingly. The whole system is hosted on a bhyve virtual machine running HAOS.
The need
With two radio-controlled thermometers on the balcony and in the garden, I sought a simple overview and, more importantly, a clear graph of the outside temperature. Those are simple units periodically sending their data over the radio on 433MHz. After researching the topic, it was clear that a standard Software Defined Radio adapter could listen to the signals and process them further. Combining it with the great rtl_433 and rtl-sdr projects was the answer.
After connecting an RTL 2832-based dongle to my laptop, I started getting data from my thermometers, but also from the neighbors and from the TPMS systems of the cars passing by.
The nice part was that the rtl_433 software already supports posting data to a MQTT server. There was already one running on Home Assistant for the ZigBee network, so that involved just creating a new user to post to it.
/var/log/rtl_433.log
{"time" : "2025-04-13 18:42:55.702554", "protocol" : 19, "model" : "Nexus-TH", "id" : 209, "channel" : 1, "battery_ok" : 1, "temperature_C" : 13.200, "humidity" : 61, "mod" : "ASK", "freq" : 433.910, "rssi" : -0.431, "snr" : 30.360, "noise" : -30.791}
{"time" : "2025-04-13 18:42:56.539182", "protocol" : 8, "model" : "LaCrosse-TX", "id" : 31, "temperature_C" : 11.300, "mic" : "PARITY", "mod" : "ASK", "freq" : 433.892, "rssi" : -12.208, "snr" : 19.251, "noise" : -31.459}
JSON log of rtl_433 decoding the external thermometers radio transmissions.
The first implementation
The main rack is located in the basement, which is why the radio signal there was poor. I placed the SDR on the first floor and connected it to the existing pfSense router. That
involved manually installing packages and struggling to have it start at boot. The pragmatic solution was to start a screen session with rtl_433 running in it.
That worked; the data was sent to MQTT, and Home Assistant was plotting nice graphs of the temperature sensors I selected. This solution was not very stable. After each reboot, upgrade, or firewall failure, I had to remember to restart it. It was not reliable, and I was not satisfied with it.
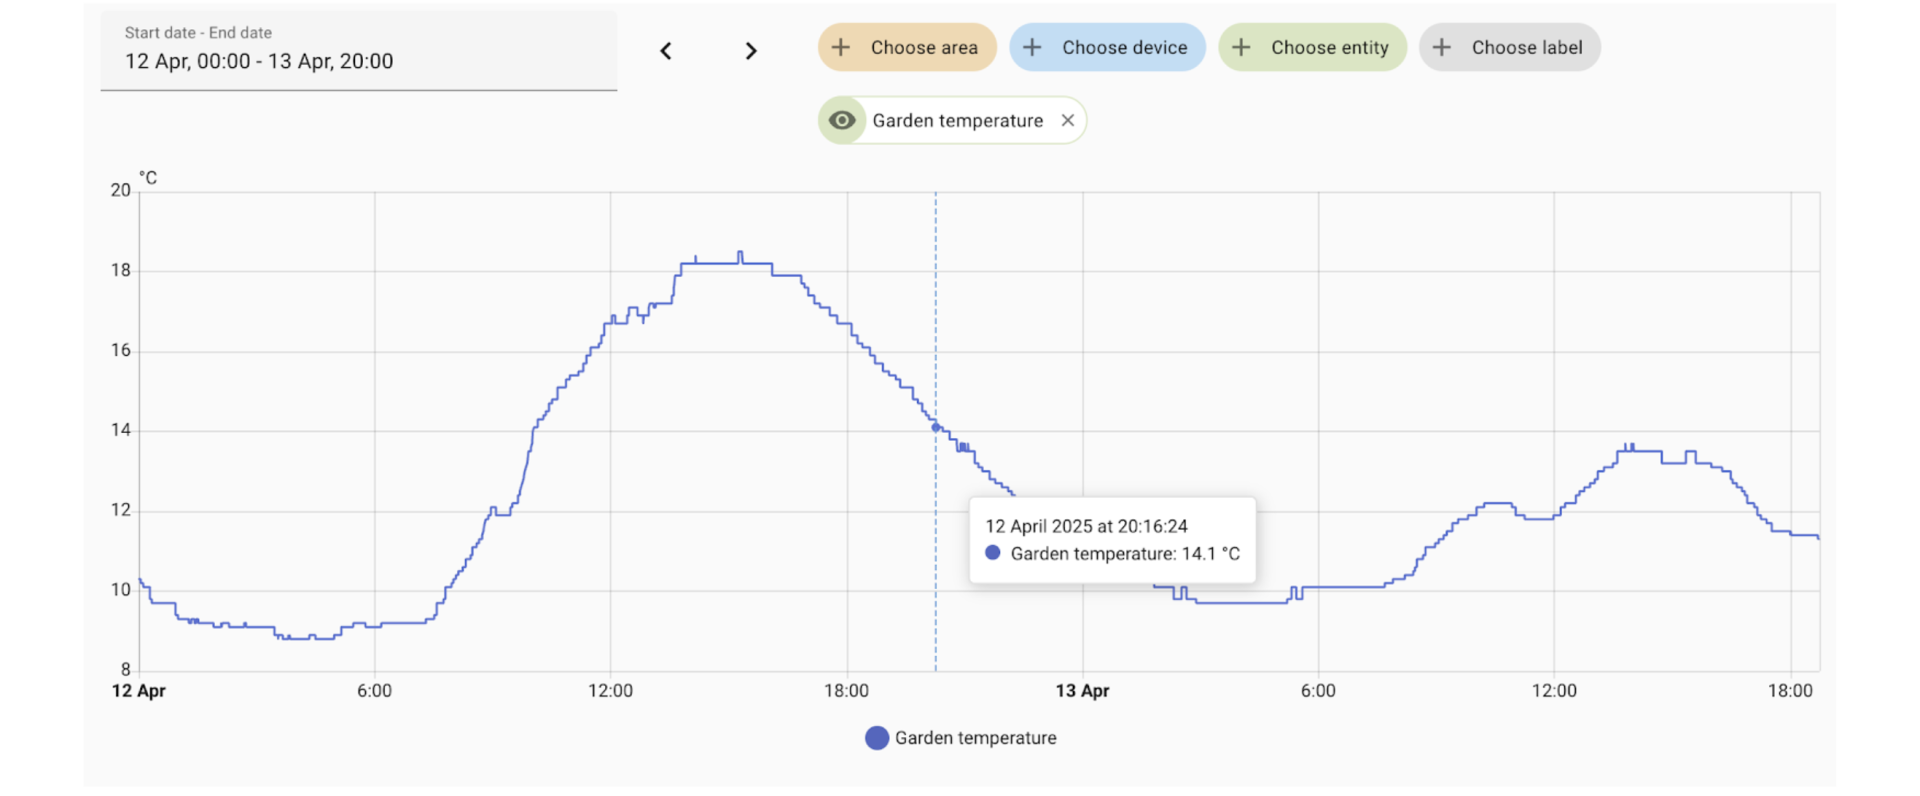
Home assistant smoothly plots the temperature captured by the Garden temperature sensor.
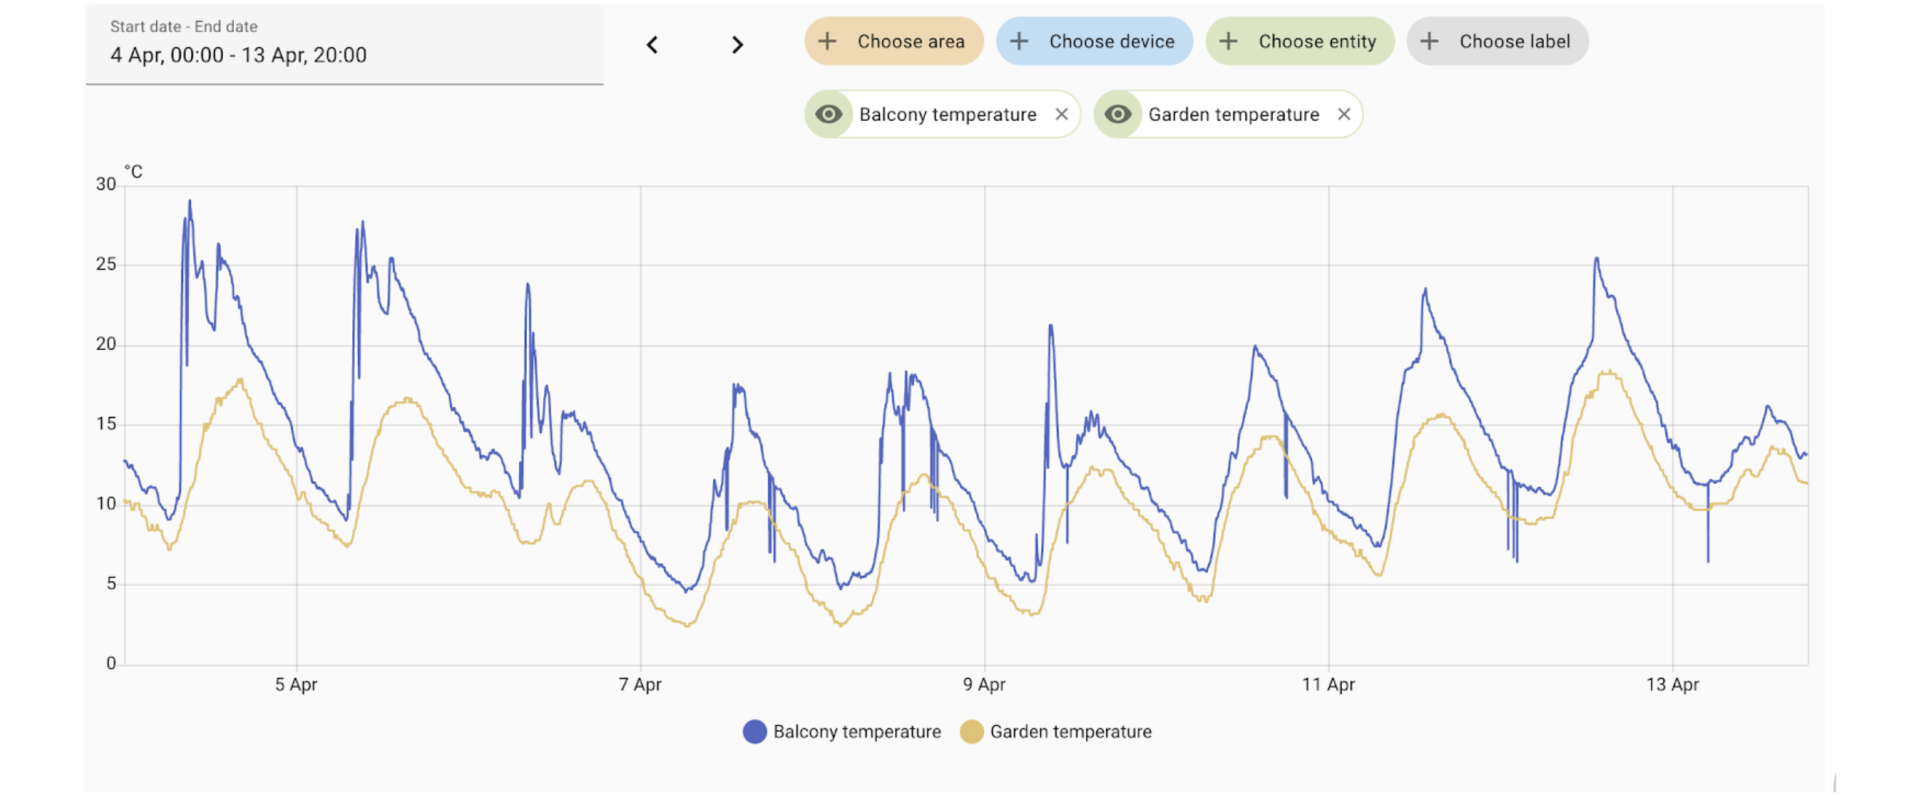
Plot of the temperatures of both sensors captured by the Home Assistant system.
The second implementation
I had a Pine A64+ lying around with no real purpose. I started verifying the FreeBSD support for it, but I quickly dismissed it due to some troubles with the reboot. The issue persists after a software reboot, indicating a hardware problem. I recall that physically accessing the board and disconnecting the power supply was too much trouble and not very practical.
EuroBSDCon to the rescue
At EuroBSDCon 2019 in Norway, there was a tutorial by Tom Jones titled “An Introduction to Hardware Hacking with FreeBSD.” Every participant received a nice little box containing switches, LEDs, cables, and other components, and most importantly, an Arm SBC.
It was a NanoPi NEOLTS from FriendlyELEC After the conference, I used it for a bit, but now it is mainly stored in a drawer. So, I started evaluating it as the platform on which to run rtl_433 and acquire the radio data.
The installed software was outdated, so I acquired a new MicroSD card and, following the instructions published by Tom Jones on his pages, successfully moved the acquisition system to it. (https://adventurist.me/posts/00297)
It was all fun and worked correctly for a few days, but then it abruptly stopped; the system was not reachable over SSH, so I resorted to power cycling it. It would have been better to attach a serial console to it to find out what the problem was, but now, I didn’t have the time to troubleshoot it properly.
Suspecting some incompatibility with the operating system release, I later wrote a crude shell script to automate the image creation based on Tom’s instructions. After a few runs, I started parameterizing it to have a quicker way to change releases and added a few other nice-to-have features.
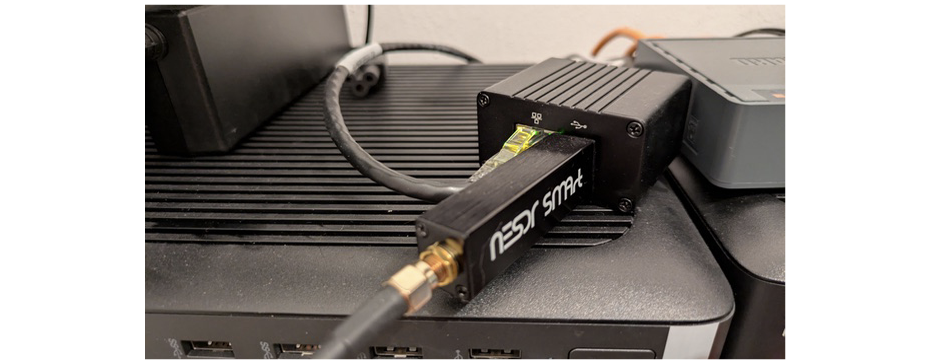
The final implementation — NanoPi with the USB SDR dongle sitting on the firewall.
Scripting
The script in its final form has a few more steps than the first version. First, we define the FreeBSD version we want to download and the source URL.
!/bin/sh
VERSION="14.2"
RELEASE_VERSION="$VERSION-RELEASE"
URL_IMG="https://download.freebsd.org/releases/arm/armv7/ISO-IMAGES/$VERSION/FreeBSD-$RELEASE_VERSION-arm-armv7-GENERICSD.img.xz"
URL_CHECKSUM="https://download.freebsd.org/releases/arm/armv7/ISO-IMAGES/$VERSION/CHECKSUM.SHA512-FreeBSD-$RELEASE_VERSION-arm-armv7-GENERICSD"
Next, we define the target image name, the directory tree, the needed packages, the u-boot bootloader location, the time zone, the packages to be installed on the target image, and the initial target image size.
TARGET_IMG="nanopi-rtl-433-FreeBSD-$RELEASE_VERSION.img"
IMG_TARGET_DIR="img-target"
IMG_MNT_DIR="img-mnt"
IMG_RELEASE_DIR="img-release"
CUSTOM_DIR="customization"
PACKAGES="u-boot-nanopi_neo-2024.07"
BOOTLOADER="/usr/local/share/u-boot/u-boot-nanopi_neo/u-boot-sunxi-with-spl.bin"
TIME_ZONE="/usr/share/zoneinfo/CET"
TARGET_PACKAGES="rtl-433 monit"
SD_SIZE="6G"
For security reasons, we create a personalized user password.
# user password
TARGET_USER_PW=`date +%s | sha256sum | base64 | head -c 13`
The further steps involve preparing the directory tree and defining the checksum files and the image’s location.
# prepare the directory tree
echo "Preparing the directory tree ..."
mkdir -p "$IMG_TARGET_DIR"
mkdir -p "$IMG_MNT_DIR"
mkdir -p "$IMG_RELEASE_DIR"
mkdir -p "$CUSTOM_DIR/usr/local/etc"
digest="$IMG_RELEASE_DIR/CHECKSUM.SHA512-FreeBSD-$RELEASE_VERSION-arm-armv7-GENERICSD"
image="$IMG_RELEASE_DIR/FreeBSD-$RELEASE_VERSION-arm-armv7-GENERICSD.img.xz"
digest_ext="$IMG_RELEASE_DIR/CHECKSUM.SHA512-FreeBSD-$RELEASE_VERSION-arm-armv7-GENERICSD.img"
image_ext="$IMG_RELEASE_DIR/FreeBSD-$RELEASE_VERSION-arm-armv7-GENERICSD.img"
The images are downloaded to the $IMG_RELEASE_DIR, but only if the image checksum is different from the existing one.
if ! [ -f $digest_ext ]; then
    echo "Digest=Initial" > $digest_ext
fi
# get the release image checksum and check the existing image
echo "Checking compressed image checksum"
fetch -o "$IMG_RELEASE_DIR" "$URL_CHECKSUM"
if ! sha512 -q -c $(cut -f2 -d= $digest) $image; then
   echo "Download compressed image"
   fetch -o "$IMG_RELEASE_DIR" "$URL_IMG"
   # reset extracted image checksum
   echo "Digest=Refresh" > $digest_ext
   rm -f $image_ext
else
   echo "Compressed image OK"
fi
The image is extracted if its checksum differs from the existing one.
# extract the image
echo "Checking extracted image ..."
if ! sha512 -q -c $(cut -f2 -d= $digest_ext) $image_ext; then
   echo "Extracting image and creating checksum"
   rm -f $image_ext
   xz -dk $image
   sha512 $image_ext > $digest_ext
else
   echo "Extracted image OK"
fi
Now the packages required on the host system are installed.
# Install needed packages
echo "Installing packages"
pkg install -y $PACKAGES
A target image is created with the size defined above and connected to a memory disk.
# Create target image
echo "Create target image and connect to the memory disk"
truncate -s $SD_SIZE $IMG_TARGET_DIR/$TARGET_IMG
mdisk=`mdconfig -f $IMG_TARGET_DIR/$TARGET_IMG`
echo $mdisk
We write the image and the bootloader to the target.
# write the extracted image to the memory disk
echo "Writing the extracted image to the memory disk"
dd if=$image_ext of=/dev/$mdisk bs=1m
# write the bootloader to the memory disk
echo "Writing the bootloader to the memory disk"

if [ -f $BOOTLOADER ]; then
   dd if=$BOOTLOADER of=/dev/$mdisk bs=1k seek=8 conv=sync
else
   echo "The bootloader $BOOTLOADER does not exist. Aborting ..."
   exit
fi
Finally, the target image is mounted, and the packages are installed leveraging the pkg–chroot option, which allows us to install packages meant for a different hardware platform elegantly. Note that a correct resolv.conf should exist on the target system.
# mount the target image
echo "Mounted target image on $IMG_MNT_DIR"
mount /dev/"$mdisk"s2a $IMG_MNT_DIR

# install target packages
echo "Installing packages on target"
cp /etc/resolv.conf $IMG_MNT_DIR/etc/
pkg --chroot $IMG_MNT_DIR install -y $TARGET_PACKAGES
The services are being enabled on the target. Again, we use a handy option of the sysrc utility to access the configuration file directly on the mounted image. Not strictly needed, but we also enable the remote syslog, which should be enabled with “-a <peer>” on the destination host. This was enabled while debugging the system, which had been hanging for a day and a half, as mentioned above.
# enable services on target
sysrc -f $IMG_MNT_DIR/etc/rc.conf hostname="nanopi" ntpdate_enable="YES"
ntpd_enable="YES" rtl_433_enable="YES" monit_enable="YES" syslogd_enable="YES"
syslogd_flags="-s -v -v"
In the customization directory, we replicate the needed parts of the system tree:
customization/
├── home
│  └─ freebsd
│      └─ .ssh
│           └─ authorized_keys
├── usr
│  └─ local
│       └─ etc
│           ├─ monitrc
│           ├─ rtl_433.conf
│           └─ syslog.d
│               └─ remote_anirul.d112.conf
└── var
    └─ log
        └─ rtl_433.log
# copy the customisations
echo "Copy $CUSTOM_DIR to $IMG_MNT_DIR"
cp -a  $CUSTOM_DIR/* $IMG_MNT_DIR
The time zone is set by simply copying the definition to /etc/localtime on the target.
Fun note — copying the CET definition on a desktop machine will cause issues in the Mozilla products. For example, in Thunderbird, the time in the email list is in UTC, but when you open the email, the time is displayed correctly. In that case, it’s better to use tzsetup and specify the correct city or copy over a city definition. I still must figure out how to report this bug.
# set the timezone
echo “Set the timezone: copy $IMG_MNT_DIR/$TIME_ZONE to $IMG_MNT_DIR/etc/localtime”
cp $IMG_MNT_DIR/$TIME_ZONE $IMG_MNT_DIR/etc/localtime
Next, the new password for the FreeBSD user is set up and copied to a file in the home directory, and next to the image file. The final cleanup unmounts the image, removes the memory disk, and provides the user with some final instructions.
# configure users
echo "Configuring users on target"
# change freebsd user password
echo "$TARGET_USER_PW" | pw -R $IMG_MNT_DIR mod user freebsd -h 0
echo "$TARGET_USER_PW" > $IMG_MNT_DIR/"home/freebsd/.pwd"

# unmount the target image
echo "Unmounted target image from $IMG_MNT_DIR"
umount $IMG_MNT_DIR

# create the password file
echo "$TARGET_USER_PW" > $IMG_TARGET_DIR/$TARGET_IMG".pwd"

# remove the memory disk
echo "Removing memory disk $mdisk"
mdconfig -d -u $mdisk

# Final instructions
echo "You can copy the image with \"dd if=$IMG_TARGET_DIR/$TARGET_IMG of=/dev/<USB Disk> status=progress bs=1m\""
echo "The password for the user freebsd is \"$TARGET_USER_PW\""
echo "The password is also available in the file \""$IMG_TARGET_DIR/$TARGET_IMG".pwd\""
In the customizations, we have the configuration files for the services. Monit monitors the rtl_433 status and restarts it if needed. Here are the lines from monitrc in which the rtl_433 service is defined.
# rtl_433
check process rtl_433 with pidfile /var/run/rtl_433.pid
start program = "/usr/local/etc/rc.d/rtl_433 start" with timeout 60 seconds
stop program = "/usr/local/etc/rc.d/rtl_433 stop"
And of course, we must configure rtl_433. The differences from the sample config are the following.
output mqtt://<homeassistant>,usr=<mqtt user>,pass=<mqtt user pwd> ,retain=0,devices=rtl_433[/model][/id]
output json:/var/log/rtl_433.log
output log
The output is sent to the MQTT broker accessible to Home Assistant or, in my case, running in the same VM. The retain flag is set to false, as I don’t want to clutter the MQTT topics with transient devices and am willing to get the devices back slower in Home Assistant.
The JSON output is also sent to a JSON file in /var/log
Lessons learned
That last line in the rtl_433 config file was the catch. In my prototypes, the log was written to /tmp, filling it in approximately 36 hours and causing the system to hang. So, never write log files to /tmp if you are not purging them.
The hardware should be reliable. I had a lot of trouble with the Pine A64+ and its reboot issues.
I learned a lot about the basic configuration of FreeBSD and once again appreciated the elegance of its tools.
The status
The system has maintained an uptime of 57 days since the last storm and power failure, during which it booted up automatically without user intervention. It is reliable, easily replicated, and upgradable to a new FreeBSD release. By swapping the SD card, it is trivial to test a new release or configuration and revert to the previous one.
In the future, I would like to explore the possibility of using nanobsd for development and consider whether this project could serve as a good opportunity to delve into Crochet/Poudriere image creation.